
I took these photos to put together a photo tutorial about inserting Craft eyes, and I’m a bit embarrassed to admit that was almost a year ago!!! I thought I’d better put this up before it’s a whole year gone by!!!
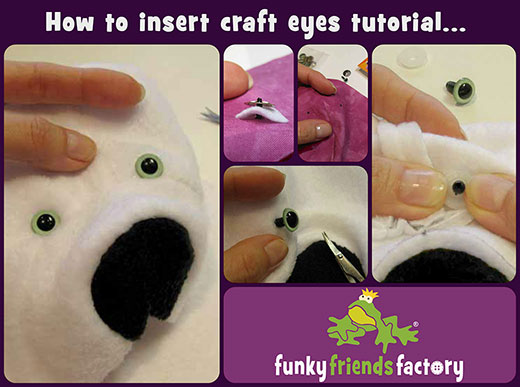
1. How to insert craft eyes in thick or furry fabrics like fleece:
STEP 1
Use a pair of sharp-pointed scissors to make a small hole, JUST large enough for the shank of the Craft eye to fit through. (I have a cheap pair of nail scissors that are perfect for this!)

STEP 2
Push the shank of the Craft eye through the hole you cut, from the RIGHT SIDE (front) of the fabric. I am using Sage Opaque Craft Eyes which are hand painted by Suncatcher Craft Eyes. They come in the most amazing shimmery colours and the quality is second to none!

STEP 3
Place the washer onto the shank of the Craft eye…and push it down EVENLY, until it ‘clips’ into place.

This is great for fleece or fur…
Fleece fabric is nice and ‘fluffy’ and so the eyes will sink into the fur/pile a little and fit nice and snuggly in place…

BUT not for THIN fabrics?
I wasn’t happy with the way the eyes looked ‘loose’ and jiggled around a bit when I used thinner fabrics like quilting cottons, so now I do things a bit differently for thin fabrics.

2. How to insert craft eyes in thin fabrics like quilting cottons:
STEP A
Use a seam-ripper to make a very small hole. Work it slowly until it is JUST big enough for the shank of the Craft eye to squeeze through.

STEP B
Push the Craft eye through from the RIGHT SIDE (front) of the fabric.

STEP C
I added a drop of ‘Fray Stop’ to prevent the eye working loose with lots of play!

STEP D
Cut a square of felt and made a hole in it with the seam-ripper.

STEP E
Place the felt square onto the shank of the Craft eye, before adding the washer and pushing it down EVENLY, until it ‘clips’ into place.

NOW look at the difference!
BEFORE:
Look what happens to the GREEN Craft eye when you stuff the toy – it pops ‘out’ of the fabric and looks awful!

AND AFTER:
LOOK how the second eye, the BLUE Craft eye fits nice and tight with no gap between the eye and the fabric!
BEA – U – TIFUL!

Well, I hope these pics have helped you see (couldn’t help myself!!!) how to make your toy’s EYES look absolutely stunning!!! : )
Please don’t forget – If you have any tips for using Craft eyes… please share the love!!!
 .
.
.
Till next time,
Happy Sewing,
Pauline
![]()

Hi Pauline !
This is Zimmy from India. I like your patterns too much, as its so easy to make, these were so easy no any hotch-potch in your patterns.
It’s too cool !
Thanks for making these stuffies & give smiles on cute babies.
With Best Wishes always
zimmy
I am enjoying making the soft toys so much. Your tutorials are so easy to follow and your helpful hints are very helpful. Loved the one with the ink pen for turning small parts. Where can I find the hints on Facebook? I was looking for the one for cutting felt, but couldn’t find it. Thanks for making it easy for a beginner. I think I am getting better and learning something with each one I make. Have made 12 so far.
Love all your patterns. I am making keepsake stuffies. I have done the melody bear of course but also kip the puppy an elephant lion and cow. Your patterns are great.
Thank you, Micheline!🥰
hi! i wuv your patterns i just went to jo ann’s and i got your lambkins, horsey(and unix!), and ellie! i hand sewed a unicorn with wings(i guess that makes it a unisiss!) for my sister, and now im making an elephant for me(for the record (my mom wont let me say my age!) im between the ages of 12 and 16)
P.S. she also wont let me say my real name.
Thank you very much! I was a bit confused beforehand because I had never used craft eyes! I now can continue with Timmy T rex! YAY!
The felt behind craft eyes makes such a big difference – definitely worth the little bit extra time it takes to add it.
😀
I haven’t tried using a small pair of scissors, but I have used a seam ripper. I wiggle it under and nick just one or two threads from the “wrong” side of the fabric. Then push the shank of the craft eye through from the right side. If the hole turns out to. Or be quite big enough then I can carefully use the seam ripper to eithe rwiggle the hole bigger or to cut a single thread, then finish pushing the craft eye through.
I haven’t tried the piece of felt when using thinner fabrics, thank you for that tip. It’s going to come in very handy!
I use a craft awl and it’s so much easier. It gives you more control with making the hole in the fabric.
Thank you for these directions. I’m using a cotton quilt fabric and the felt makes a big difference.
Hey Candice, thanks! Isn’t is funny how such little things can make a such a big difference! 😀
If adding a safety nose how would you get it centered. It is usually on a seam. How would you reinforce the seam?
Connie, You can make a hole right beside it so you don’t have to noses in the seam.
Thank you for all your tips. I have a tip for craft eyes if you’re having difficulty pushing the washer on completely. Put the correct side of the eye on a hard surface. Then put a cotton reel over the shank of the eye and the washer and push the cotton reel down hard until the washer clicks into the correct position. This works better than trying to push them together by hand.
Hey Alison, that’s a great tip! Thanks!!! 😀
What is a cotton reel?
Hi Anne, I think you’re asking about Alison Reid’s comment about cotton reels – maybe you call it a spool of cotton? The bit of wood/[plastic that sewing machine thread comes on. These have a hole in the middle that can fit over the shaft of a craft eyes and you can use this to push the washer on with. 🙂
That is a great idea to help get the eyes on Alison! Thanks!
I’ve been sewing since jr. High, I’m now 70 and was tickled pink to find directions on line. Explained perfectly and putting on the eyes was so helpful. Thanks for the help!!
Thanks for this info. I just had my husband help me with the eyes because I couldn’t push hard enough. He will be glad to know there’s an easier way!
I-m making my first Funky Friends (Sparkles Seahorse) and all the tips and tutorials have been very helpful. So Thank you, now back to putting the craft eyes on! I’ll send a picture when completed.
What size craft eyes do you recommend?
Hi Arlene! I use LOTS of different sizes – here is a blog post with some info for you about toy eye sizes –
https://www.funkyfriendsfactory.com/blog/my-what-big-craft-eyes-youve-got/
xxx
Pauline 😍
I want to thank you for terrific instructions and tips. I am working on Heather and just finished instructions for the eyes…big help. Linda
I don’t have any felt so I am trying a double layer of white fleece. I think it will work. I am making Digger the Dachhound for my sister-in-law who had to put her dog down. I am making it in a reddish brown mottled cotton. It looks really good so far.
I’m sure your sister will love her new fabric friend! <3
Would you use the safety nose the same way as the eyes? Thank you for the great patterns!
it was so nice to meet you at the Houston Market hope you had a safe trip home (Next time I will come to your booth before you sell out).. your new Bestie
Look forward to seeing you next year!!!!
I’ve sewn many of your patterns for over 4 years now and your helpful hints still amaze me (started with Patches the cat and also Melody bear). THANKS SO MUCH! Looking forward to all the new patterns you’re producing!
Thanks Laura! I just want people to see how much fun (and easy) it is to sew homemade toys – BUT it’s so nice of you to say thanks!😁
I’m making my first soft toy, thanks for the great tips!
What type of stuffing is recommended for the soft toys
Hi Betty, I have a lot of information about options for toy stuffing in this blog post – https://www.funkyfriendsfactory.com/blog/toy-stuffing/ BUT I would also recommend taking a look at my FREE toy-making course which has LOTS of great toy making information, tips and tricks! You can find about this AND lots more resources for beginners here – https://www.funkyfriendsfactory.com/blog/new-to-sewing-toys/
xxx
Pauline
I have cut the pattern out and looking forward to looking through my stash to see what I do have to try this pattern out. I have tons of eyes and what I do is after you get the eye back on I burn the shaft piece at the tip, when it is hot I blow it out and place the tip onto a piece of tile that is for crafting so it will not ruin a good piece. Once you place it onto the tile then push it down a bit. The eye will not come off when finished, as it has a flat surface on the other side of the eye. I do like your idea of putting the other piece of fabric on the inside. But if you are using the fray check I don’t think it would be wise to use the lighter to burn the end.