
Toy making Tips - newsletter archives.
 Funky Friends Factory Newsletter Archive
Hi there,
Today I'm going to share My 7 SUPER Toy Stuffing TIPS with you!
When I made my first softie it took me so much longer to STUFF it than to sew it! So I know EXACTLY how it feels for a beginner - you've just finished sewing your toy and you think you're almost finished.... but then, stuffing it seems to take F-O-R-E-V-E-R!
Don't worry! It's quite normal!

I have learnt these stuffing tips and techniques over the years BUT I want you to be able to start using them right away! These great tips will make your toy stuffing a lot easier and quicker, and will make a big difference to how your toys turn out. Right, let's get started!!! :)
My 7 Super Stuffing TIPS & TECHNIQUES:
1. Try to take it SLOW (easier said than done!)
If you rush and push the toy stuffing in as quickly as you can, you will create lumps, gaps, soft parts, bulges and even give your toy an uneven, lop-sided shape!. This might be OK for your first toy (perhaps?) but if you take your time to stuff your toys nicely, you will create beautifully finished toys - you'll see it's really worth it!
* Abby's so little but she's done a brilliant job helping to stuff her Mitch the Monkey!
See - it's NOT THAT HARD! :)

2. Choose a good stuffing material.
Using a good quality material will also help you to create a good finish. There are so many types of toy stuffings you can choose from that I wrote a whole blog post about different types of toy stuffing!
Different types of toy stuffing can be used for different types of toys. For example, you might like to use one kind of toy stuffing for baby toys and something else for a toy that will be for display only (that won't be played with!). I use lots of types - cotton, bamboo and wool stuffing but the toy stuffing that I use MOST OF THE TIME is polyester toy fill. I like it because:
- it is easy to find
- it is cheap
- it is light-weight
- and it is easy to work with.
* This is a very personal choice - so experiment a bit and decide
which toy stuffing is best for YOU to use.

3. Use small bits of stuffing at a time.
If you add the toy stuffing in big clumps it will make the toy lumpy. This is because there are gaps between the pieces of stuffing and the stuffing is not spread evenly. At first it might take you a bit longer to stuff your toys if you use smaller clumps, but try it - it makes a big difference!
* A clever tip is to get LOTS of small bits ready first!

The small parts of your toy, like the tips of the hands and ends of the legs (the feet?) might still have gaps or soft parts if the toy stuffing doesn't get into these ares to fill them enough. If this happens, you need to use even smaller bits of toy stuffing. Here you can see that I used the small bits of toy stuffing when I stuffed my Kawaii Teddy's legs and even smaller bits for his arms!
* Use smaller bits of toy stuffing for SMALL parts and bigger bits for the BIG parts.

4. Stuff the smallest parts first.
Take a look at your toy before you begin stuffing it and decide which parts to start stuffing first.
I begin stuffing the smallest parts of the toy first - like ears, hands, feet and tail. Then I stuff bigger parts of the toy - like arms and legs. Lastly I stuff the biggest parts of the toy - like the head and body. This helps to make sure that ALL areas of the toy get stuffed well as you go along.
* START SMALL AND GO BIG!
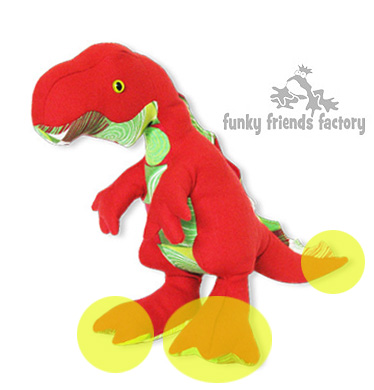
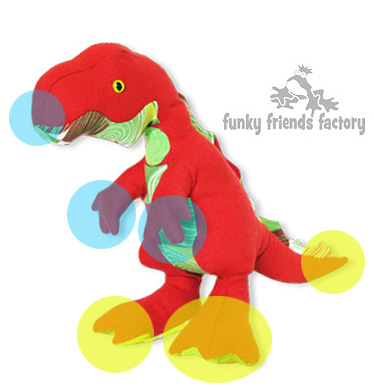
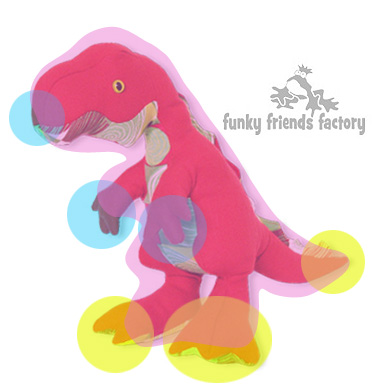
For Timmy T Rex I like to stuff the yellow highlighted bits first,
then the blue bits, then the rest (pink bits).
I use another great technique for stuffing toys with UNUSUAL SHAPES which helps me to decide which parts to stuff first. "Start stuffing the parts furthest from the stuffing gap". Often this is a small part too, like the hands, fingers or toes or the tail!
* For Sammy the Shark I start stuffing the tip of his tail.

5. Use stuffing tools... if you like gadgets!
There are lots of helpful tools for stuffing like haemostats (medical tweezers), sewing tweezers, stuffing sticks and stuffing tubes. I have tried lots of these and over the years I have spent lots of money on tools, some I never even use! I think the great thing about sewing softies is that you don't have to spend lots of money on tools.
* I have found that a wooden chopstick or a children's paintbrush make excellent stuffing tools!

AND don't worry if you don't have a stuffing tool - I still find the BEST 'TOOLS' for stuffing softies are my own hands and fingers!!!
Another great tip is to use BOTH hands! If you can stuff with both your right and left hands this helps to make your toys more even in shape. When I am stuffing my toys, I stop and look at the toy from time to time. If the toy looks lop-sided, it's because I have ONLY been using my right hand to stuff. It is hard to use my left hand because I am right-handed, but over the years I have become better at it, so I CAN stuff with my left hand... well, enough to make the toy look even again... then I go back to my right hand!
* My little finger is the best tool for stuffing small awkward parts of the toy.
AND look - this is my LEFT HAND! :)

6. Don't overstuff a stuffed toy!
Your goal is to make your toy looks nice and firm BUT still feel soft and cuddly. Add just enough toy stuffing to give shape to the toy and make it nice and firm. It must be firm because the toy stuffing will compact a bit over time. Too much stuffing causes the fabric to stretch, the stitches to show, and it will make your toy look bloated (overfed?). If you overstuff the toy you can actually burst the seams. What a pain! You'll have to pull out all the stuffing and go and fix the burst stitching of the seam at that spot!
* That's why I like to say "Quit while you're ahead!"

Whoa!
STOP!
I feel S - T - U - F - F - E - D !!!

7. LASTLY...Give your soft toy a massage.
It might sound funny but this is SERIOUS! Massaging the toy while you stuff will even out the areas that are a bit lumpy. This is because it helps to remove any gaps between the pieces of stuffing you have stuffed inside the toy. Massaging the toy will give your toy a nice smooth even finish.
* Here I am massaging Puppy Pete's head to spread the toy stuffing evenly as I go!

Plus your new Funky Friend will love you forever if you do - haha!!!!
* Party Animal is a sucker for a massage...
Well, there you go - lots of cool TIPS and TECHNIQUES to make your toys FABULOUS!
![]()
Now I'm really looking forward to seeing YOUR beautifully stuffed toys ~> come share your photos on my Facebook page!
.

Till next time,
Happy sewing,
Pauline
xxx
Funky Friends Factory, P O Box 814, Aspley, Brisbane, Queensland 4500, AUSTRALIA