
Today I’m going to show you what some re-sized toys look like AND how you can easily re-size a toy pattern yourself! (Once you know the basics of re-sizing patterns, it’s EASY!)
It’s FUN to make an EXTRA SMALL toy!
Alison made this adorable little Ellie Elephant Pattern, who looks so sweet…
next to his big sister!

And Novita (from verypurpleperson.com) has made Plattie the Platypus 200% larger for her husband’s 40th birthday and a Mini Plattie for her son…
a Papa and Bubba Platypus!

HOW to re-size a pattern SMALLER?
Tip: If you re size the pattern and make it VERY, VERY SMALL, it can be very difficult to sew. So don’t shrink a pattern too small. I don’t recommend going smaller than 20% because there is a limit to how small a piece you can actually hold to sew!
A. Shrinking a PDF pattern with a Printer:
If you have purchased an PDF Download pattern it is very easy to re-size it SMALLER using your own home printer! When you print out the pattern, simply choose a smaller percentage (%) to print the pattern pages out at a smaller size. All you have to do, is decide how much smaller you want to re size your toy pattern, maybe just a LITTLE bit smaller (Print at 90%) or a LOT smaller (Print at 20%).
B. Shrinking a PRINTED pattern using Photocopying:
Place the full size pattern in the photocopier. Print the size you want eg. half size – print at 50%, quarter size – print at 25%.
![]()
It’s also FUN to sew an EXTRA LARGE toy!
Kylie’s EXTRA LARGE Horse and Unicorn Pattern just look extra huggable!

Shirley made a whole herd of small, normal and EXTRA LARGE versions of the Raff the Giraffe Pattern. You can see more of her re-sized Funky Friends toys on her website which is called Pets by Shirl. Her giant Giraffe took a 1 kg bag stuffing – no wonder she called him ‘Gigantor’!

Sara enlarged the Baby Bunny Pattern 200% so that his body measures about 12 inches long (that’s about 30cm!) plus his legs. She says he is almost as big as her 2 year old nephew!

HOW to re-size a pattern BIGGER?
TIP: A much bigger toy will need heaps of toy stuffing –
so buy an extra large bag!!!
A. Enlarging a PDF pattern with a Printer:
If you have purchased an PDF Download pattern it is very easy to re-size it BIGGER using your own home printer! You just need to use the correct settings!
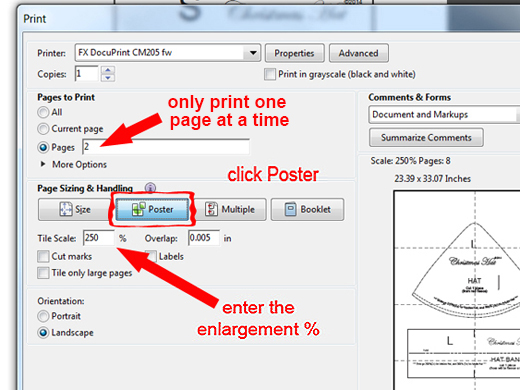
- First decide how much bigger you want to re size your toy pattern – maybe just a LITTLE bit bigger (Print at 120%) or a LOT bigger (Print at 200%).
- In the Print dialog box – enter the larger percentage (%) to print the pattern pages out at a larger size.
- You must adjust your printer settings to print as a Poster – because the pieces will not fit onto a “normal” printer page anymore! (I have a verrrrry good explanation how to use poster settings to enlarge a pattern in my FREE Santa Hats Pattern so please check that out if you need help with using the poster settings!)
4. Use sticky tape to join the pages together and cut out the enlarged PIECES.
5. Cut out and sew as usual!

B. Enlarging a PRINTED pattern using Photocopying:
- Fold the pattern page in half. ( I actually cut the pattern page in half so I can put the 2 parts in the photo copier one at a time).
- Use the photocopy machine to re-size the one half of the page to the next size up. (eg. A4 – A3 or ANSI Letter – ANSI Ledger)*
- Do the same for the other half of the pattern page.
- Stick the photocopies together and the resulting page will be the next size up!
NB: This is NOT double the size… One page size up is only about 141% so that’s about 1½ times as big!
If you want TWICE as big:
Repeat Step 1 – 4 AGAIN, and once you have your pattern re-sized to the next paper size up… It will be 198%. So again it’s ROUGH, but it’s about 200% or TWICE as big!
* A note about what paper size to use:
Internationally the most frequently used paper size is the A4 paper size, except in the United States and Canada, where the American National Standards Institute’s ANSI Letter paper size is in use. It seems silly that we use 2 systems as these 2 sizes are VERY CLOSE in size. In a nutshell, when you fold one of these official sizes in half, you get the next size down, and when you put 2 pages side by side, that will be the next size up!
NB* I have made sure my pattern pages are designed so that all the pieces fit within the ISO A4 and the American Letter size paper too, so they will ALWAYS print out properly! Just in case you were wondering which size I use! : )
IMPORTANT TIP When you are printing my PDF patterns – make sure you print them at 100% or “Actual Size”. Don’t use the setting “Fit to page” because it may resize the pages different amounts and the pattern pieces may not fit properly!
Have an EXACT SIZE in mind?
What if you want to make your toy an EXACT SIZE? Say you want your finished toy to be exactly 10inches (25cm) in size…
You can use mathematics to work it out!

First you need to know the size of your existing pattern and what is your desired size. You can get the percentage to enlarge or shrink the pattern by dividing the SIZE YOU WANT by the SIZE YOU HAVE and then multiplying this by 100. For example, the toy SIZE YOU WANT is 3 inches and the pattern SIZE YOU HAVE is for a toy 5 inches in size…
This is the formula to use:
For shrinking the Pattern:
SIZE YOU WANT / SIZE YOU HAVE
3 / 5 = 0.60
0.60 x 100 = 60%
* So you must print out your pattern at 60% (or program the photocopy machine to produce a copy that is 60% the size of the original.)
This can also be used for enlarging if you have a large format printer or on a photocopy machine!
For enlarging the Pattern:
SIZE YOU WANT / SIZE YOU HAVE
6 / 5 = 1.20
1.20 x 100 = 120%
*So you must print out your pattern at 120% (or program the photocopy machine to produce a copy that is 120% the size of the original.)
TIP: If you don’t like mathematics, I found a helpful table at The Online Quilt Block Pattern Library . It is for quilt blocks – but works perfectly for working out the amount to shrink or enlarge a pattern!
![]()
I love to see photos of the toys YOU have enlarged or shrunk!
So please post some pics to my Facebook Page!!! 😀

Till next time, happy sewing,
Pauline
xxx ![]()

When resizing a pattern, do you need to also adjust the seam allowance? Or am I just making it too complicated??
Hi Tanya, sorry I only saw this now… yes I do adjust the seam allowance if I have enlarged or shrunk a pattern quite a bit. 😀
Hello. How do you know how much to adjust the seam allowance on a resized pattern. Most are 5mm,correct?
what is the seam allowance guides you would recommend please ?
You do not need to change the seam allowance unless you are increasing or decreasing more than 20 percent. If you are going beyond 20% in either direction, measure the seam allowance on the new paper pieces you have printed and use that amount. If you have detailed questions on this, the best place to ask is the Funky Friends Factory Factory Patterns Fan Club on Facebook. Just enter that into the search bar to apply to the FB group.
If you are sizing up, try a 1/2 inch seam allowance.
Most clothing patterns are 1/2 or 5/8 inch.
That looks so easy – I’m going to try it!
Thanks for this great info, Pauline – I was wondering how some people had made GIANT versions of you toy patterns. Now I want to try some too.
I often wondered if you could do this but was too scared to try making something to find out halfway it didn’t work!
Thanks for this post, I wanted to reduce the size of your patterns to make baby toys for my newborn baby!
So cool… I wonder what’s the biggest Funky Friend ever made?
I’ve seen some ginormous hippos and giraffe’s made by Sherry Cuddle Critters, I think she’s made the 200%. Scary how much stuffing they need!!!! 😀
I’ve made Diggles at 400% once. Sooooo much stuffing….
I like bigger plushes for cuddling. Smaller ones or normal size ones are great for gifts for friends!
Is it okay to stuff children’s toys with rice? These toys are for 6 to 9 year old children. Small bean bag frogs.
Hi Ann, there’s a simple rule I like to stick to for toy-stuffing – “nothing smaller than 3cm for children under 3” 😀
Is it best to dismantle a toy and then resize, making a paper pattern and would it make sense to make a first attempt in curtain lining to check it all fits together?
Autistic grandson requires a large plush dog to cuddle.
Hi Ann, It is best to buy a PDF pattern so you can print it at 120% – or you get a printed pattern enlarged at a copy shop. Or you can buy a LARGE dog pattern, I’m sure there are a number on Etsy. I not entirely sure what you are asking but I can’t advise you about dismantling an existing toy ands reproducing the design without permission from the copyright owner because that constitutes copyright infringement and would get me into legal trouble!😱 In any case, I always recommend supporting an independent designer – we are all home sewers trying to earn a living selling our patterns. 🥰
Fantastic article and makes it so really clear, thank you! 💜
Thanks so much for this article!! I printed it up so I can take it with me downstairs. I’ve wanted to try that but I wasn’t sure how. BTW, has anyone had where there printer would print different sizes without you adjusting it? I printed up Melody bear patterns. Later I discovered that one printed up larger than the other. I had to be very careful about not mixing the pieces up. Yes that’s how I found out they weren’t the same size.
Hi Dayna, I always double check that my printer is set to “Print at 100%” – I have been caught out myself so I check the percentage EVERY TIME I print! 🙂 I have a LOT of info about printing PDFs in one of my FREE Toy-making Course modules which you can check out here – https://www.funkyfriendsfactory.com/blog/how-to-download-pdf-patterns/
I just finished two flamingos and would love to share but I don’t see where to post a comment/photo on your FB page.
OK… I may have posted a similar comment but am still at a loss.
I just finished two flamingos and would love to share but I don’t see where to post a comment/photo on your FB page.
I have a Question on the “overlap” option- it was defaulted to 0.005 as default, BUT does that mean I overlap the edge of the page by that measurment? If I set it to .5 would that mean 1/2″ overlap?? my pieces didn’t quite line up with how it was set ( how many inches/ mm is0.005?)
What does it mean on the pattern piece saying Cut 2 one reversed?