
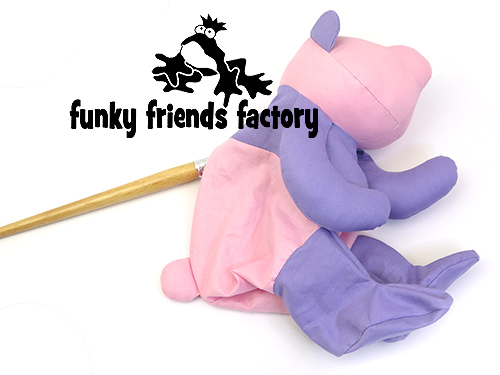
I made this photo tutorial so you can see how to sew my Panda Sewing Pattern ~> scroll down for step-by-step photos!
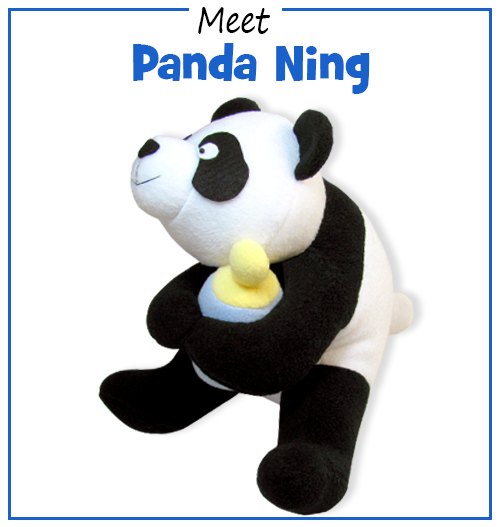
There’s a story behind this design – it was based on the pandas that were orphaned by the Sichuan earthquake. I have chosen Ning as the name for this sweet little panda because it means tranquil/peaceful. Hopefully they are living peacefully in their new refuge.
*** PLEASE NOTE – this in ONLY a PHOTO TUTORIAL ***
The FULL PATTERN IS NOT included here.
It is NOT A FREE PATTERN.I have made this photo tutorial so people who have purchased the pattern can SEE how to sew a toy panda bear (I wanted to explain this so you are not disappointed if you have found this page via a search engine and not from the link in my Panda Ning sewing pattern!)
* The Panda Toy Pattern is available to buy, from the Funky Friends Factory website as an Instant Download e-Pattern.
First choose some fabric
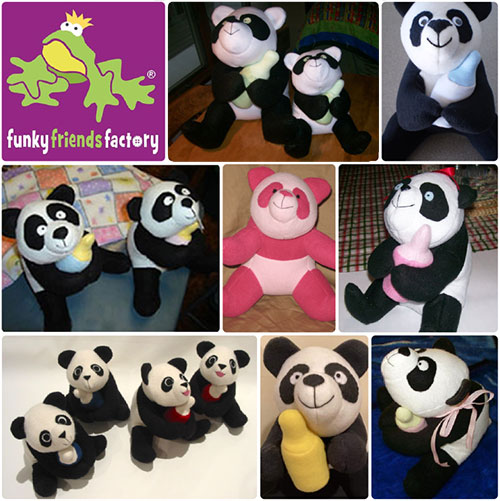
The Panda toy can be sewn in most fabrics. I sewed Ning out of quilting cottons but stretch (knit) fabrics like fleece or Cuddle would be nice and snugly!
A panda toy doesn’t HAVE to be black and white!
Right, let’s get sewing!
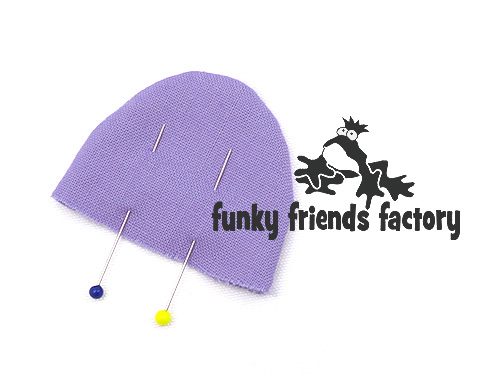
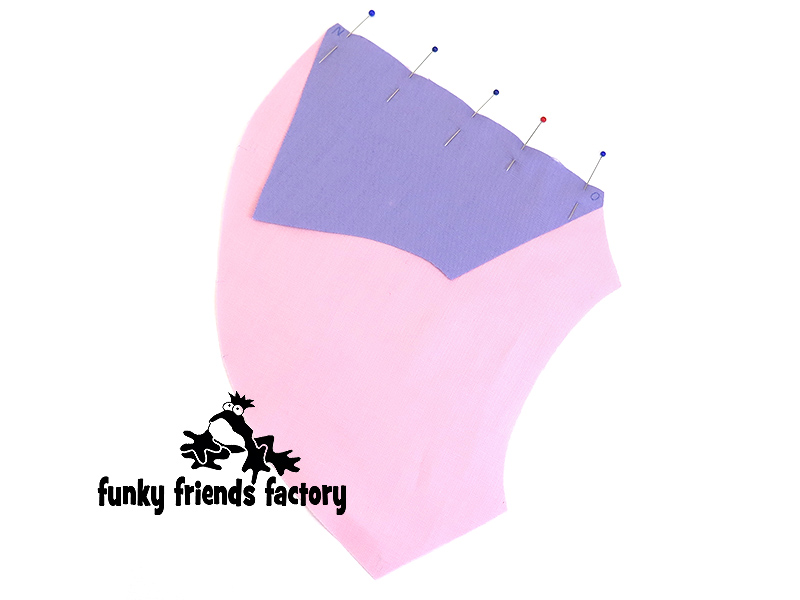
We start with the SNOUT:
STEP 1
Sew the SNOUT PIECE to the FRONT HEAD PIECE from A – B, as shown on the pattern markings.
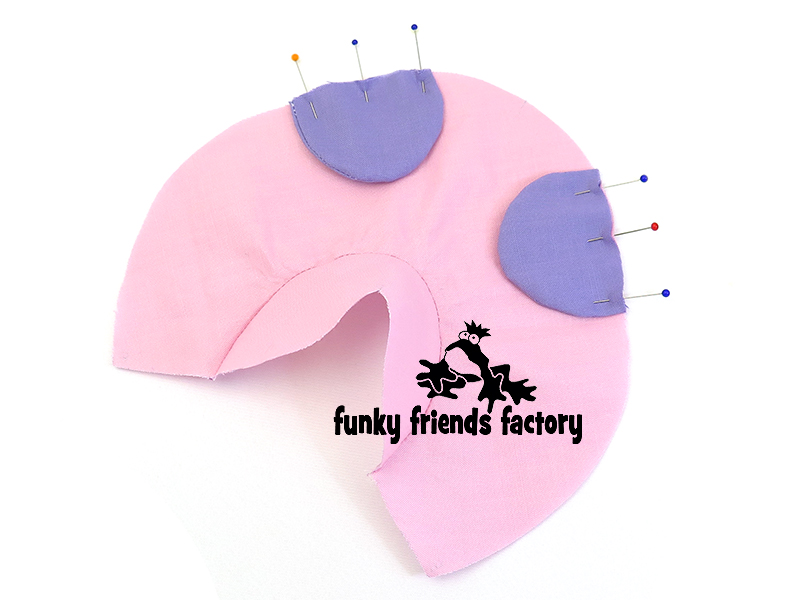
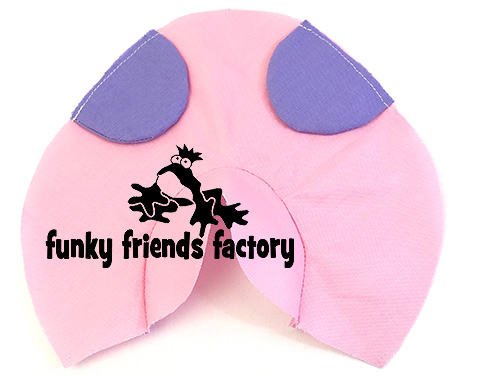
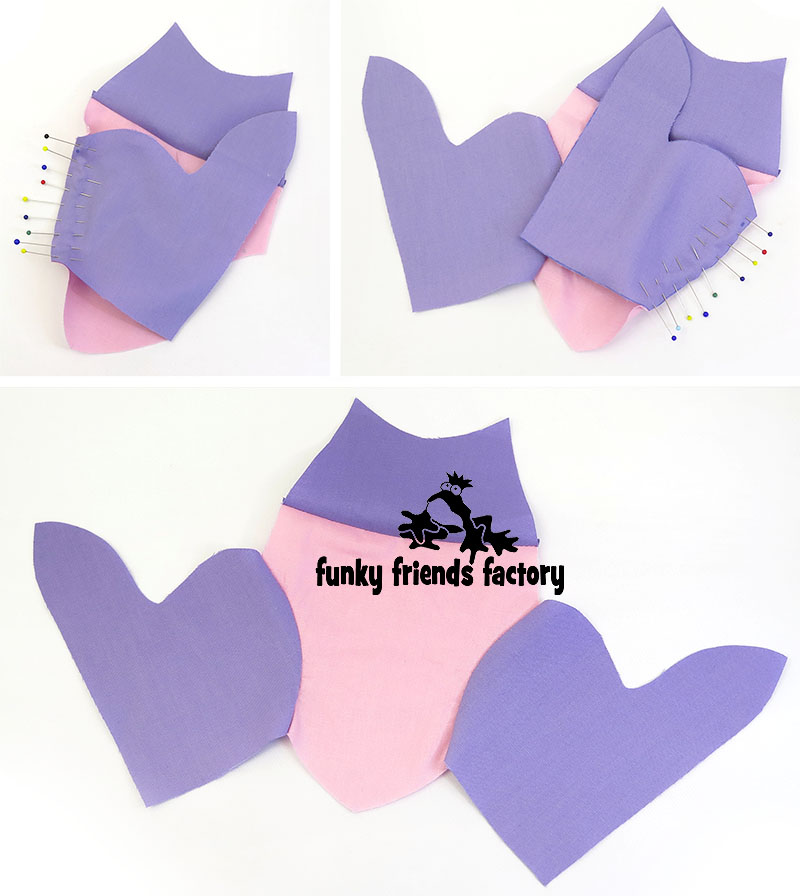
EARS:
STEP 2a
Sew the EAR PIECES together in pairs.
STEP 2b
Clip the seams of the EAR PECES and turn them right side out. ***Do NOT stuff the EARS!***
TIP: I like to use a wooden chopstick to help turn the seams nicely. Run the end of the stick back and forth along the stitching inside until the seam is nice and smooth.
STEP 3a
Pin the EAR PIECES to the FRONT HEAD PIECE, using the pattern markings to guide you.
STEP 3b
Sew the EAR PIECES to the FRONT HEAD PIECE with a 3mm(⅛inch) seam allowance (This stops the EAR PIECES from slipping as you sew – wonky ears are not always cute!).
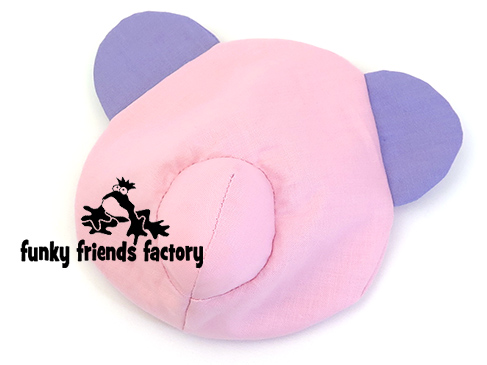
HEAD:
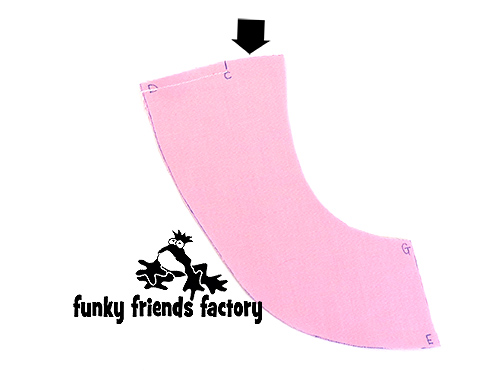
STEP 4
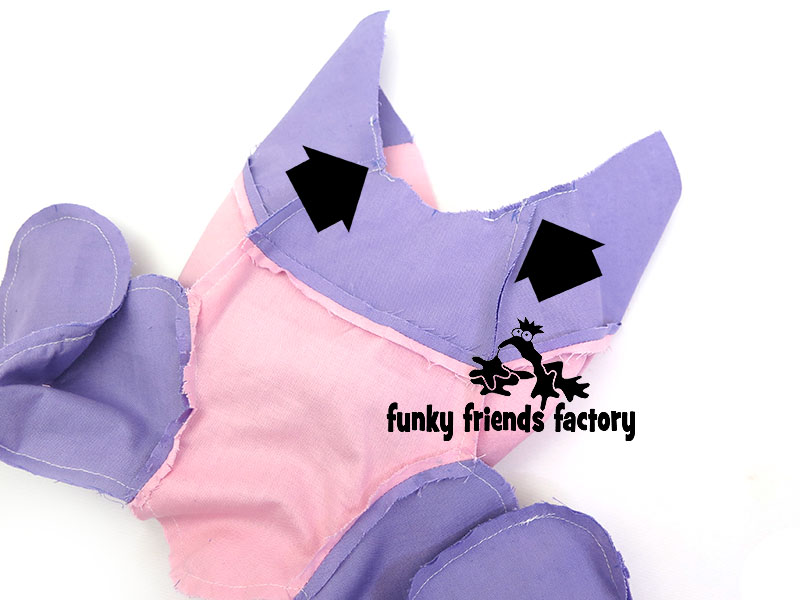
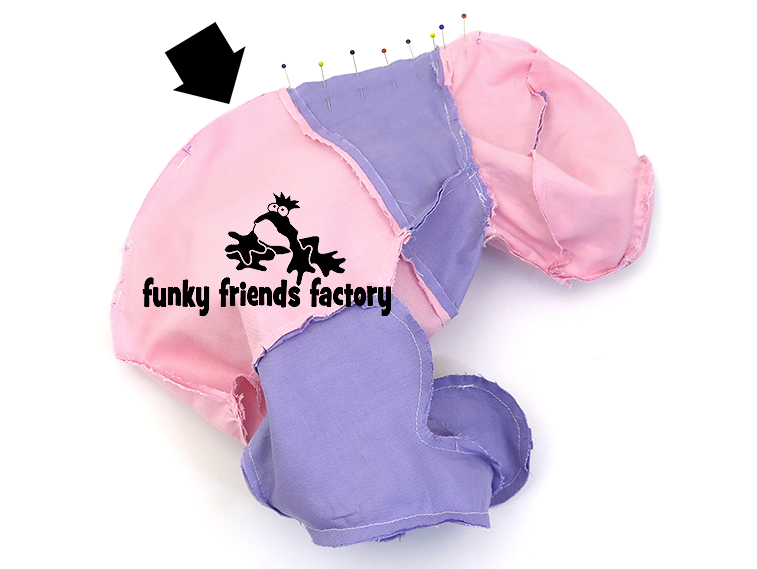
Sew the BACK HEAD PIECES together from C – D.
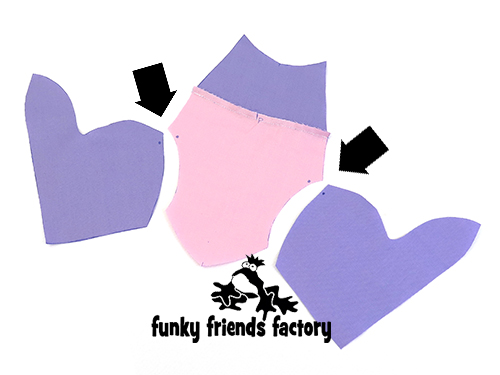
I have added a black arrow in the photo below
to show you where to leave the seam open at the back!
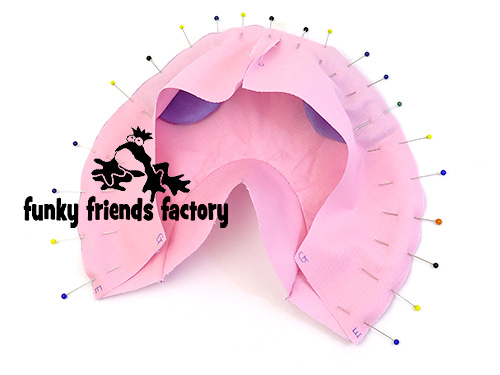
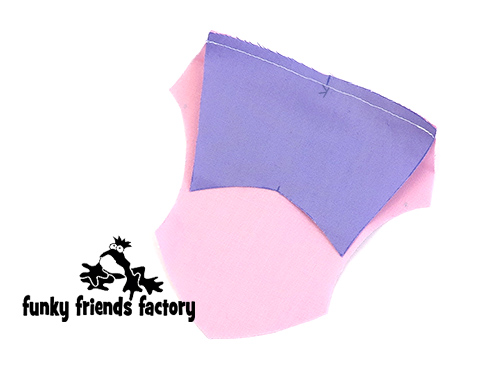
STEP 5
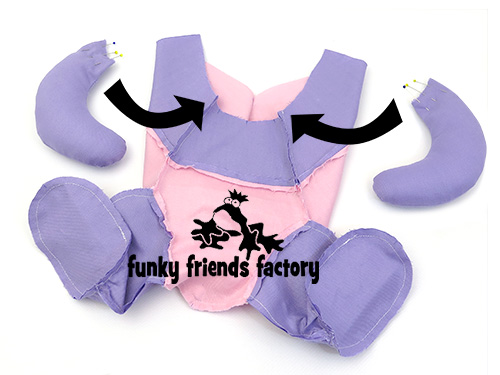
Sew the BACK HEAD PIECES to the FRONT HEAD PIECE, from E – D- E, with the EARS in between.
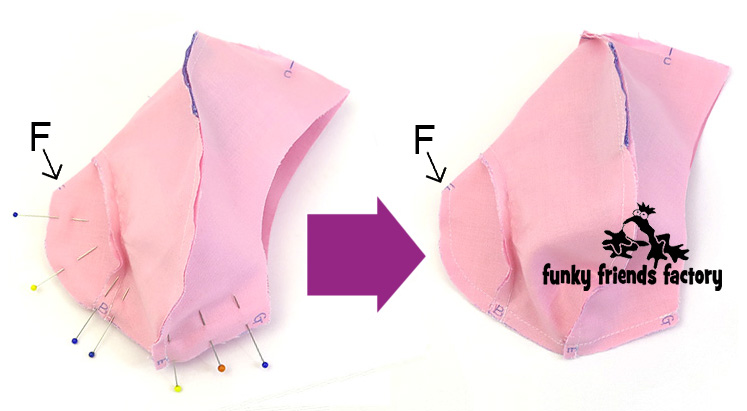
STEP 6
Fold the SNOUT at F so you can sew the SNOUT, FRONT HEAD PIECE and BACK HEAD PIECES closed from F – (via A/B) – E – G.
TIP: It’s easy to get muddled with LOTS of pieces, so – I’d say this is my “BEST TIP EVER” – Transfer the letters of the pattern markings to the fabric pieces – then all you need to do is match them up – and you can’t go wrong!
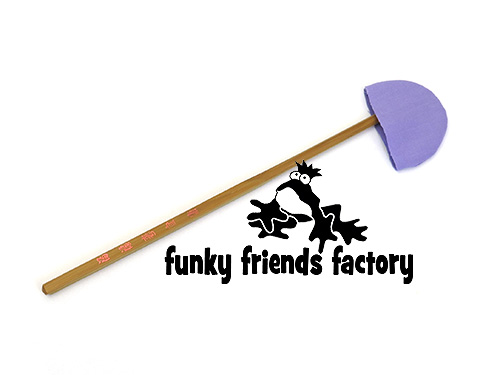
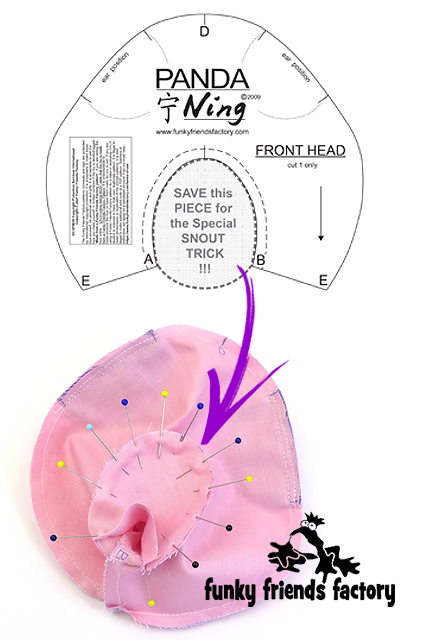
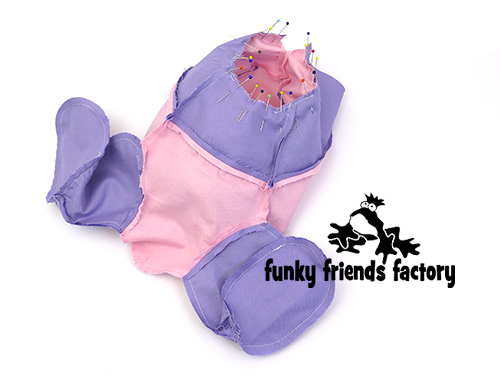
SPECIAL SNOUT TRICK!!!!
STEP 7a
*** This is important so that you can stuff the SNOUT nice and firm!
Take the piece of fabric that you saved when you cut out the FRONT HEAD PIECE, and with the head still inside out, pin this over the opening to the snout .
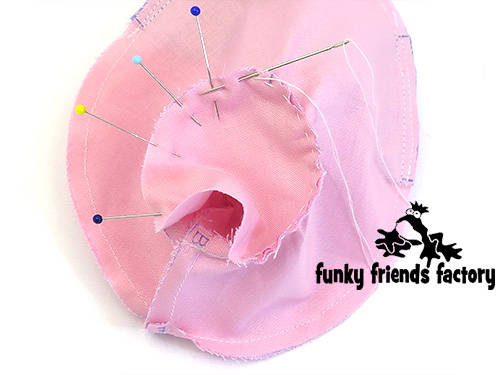
STEP 7b
Sew the SNOUT TRICK PIECE over the opening to the SNOUT by hand (very roughly – no need to be neat!). Leave a small opening for you to push the toy stuffing into the snout area.
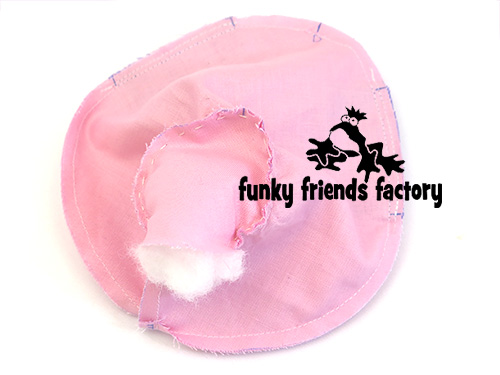
STEP 7c
Stuff the SNOUT nice and firmly and sew the opening closed.
TIP: I like to check the front of the SNOUT to see if all the wrinkles are gone BEFORE I sew it closed!
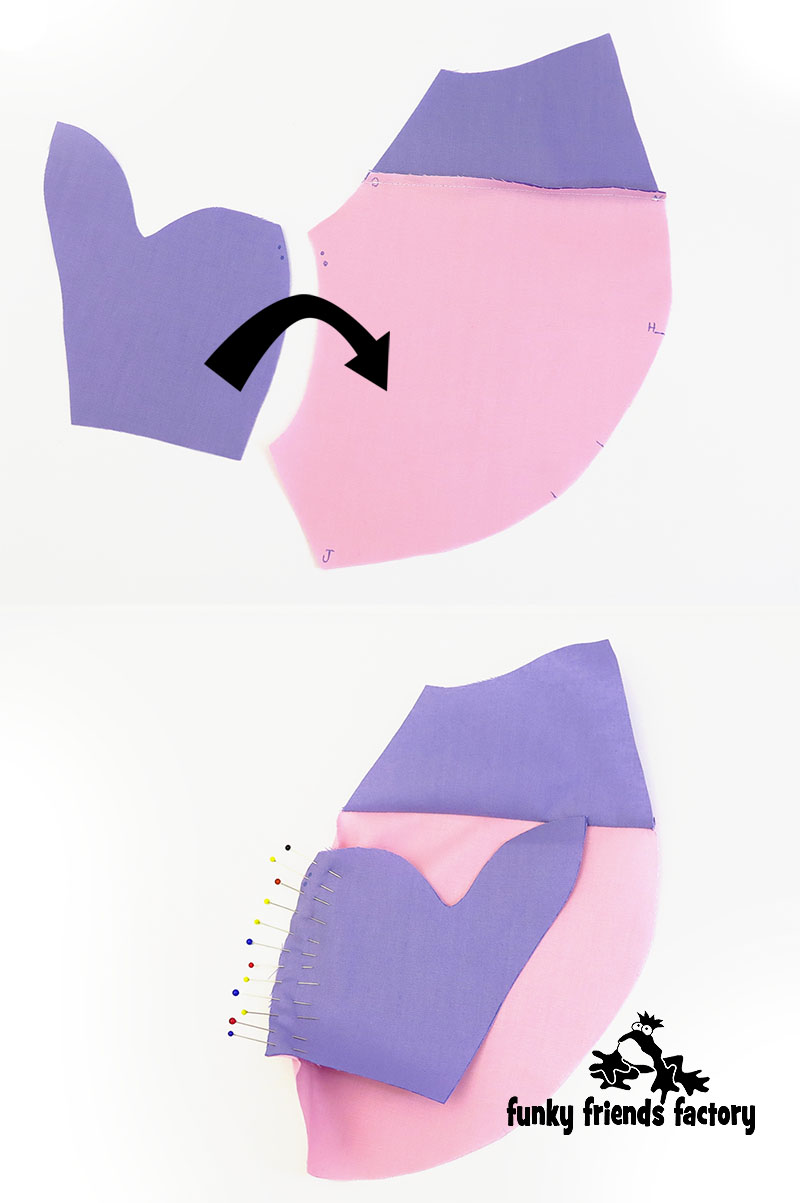
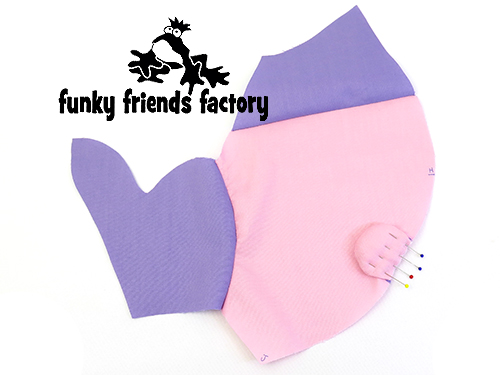
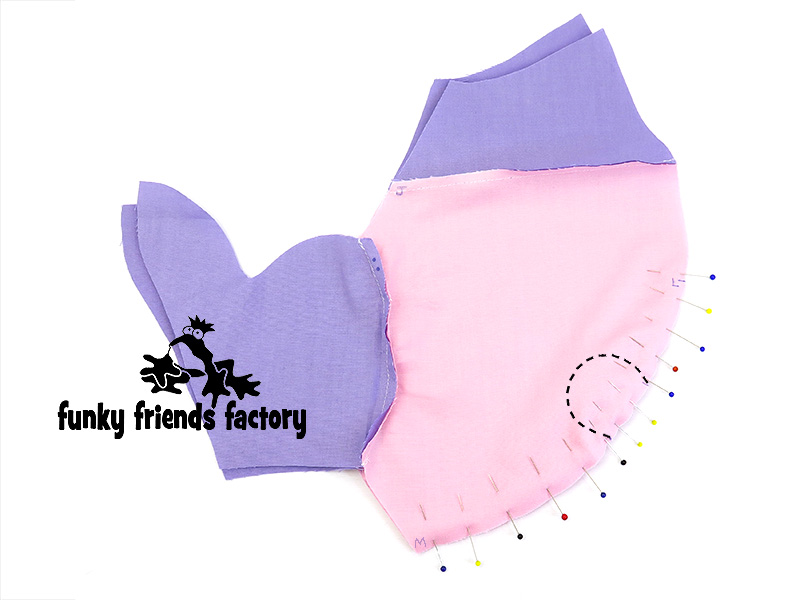
BODY
STEP 8
Sew each SHOULDER PIECE to a BACK PIECE from H – J.
STEP 9
Sew the CHEST PIECE to the TUMMY PIECE, matching point K in the middle.
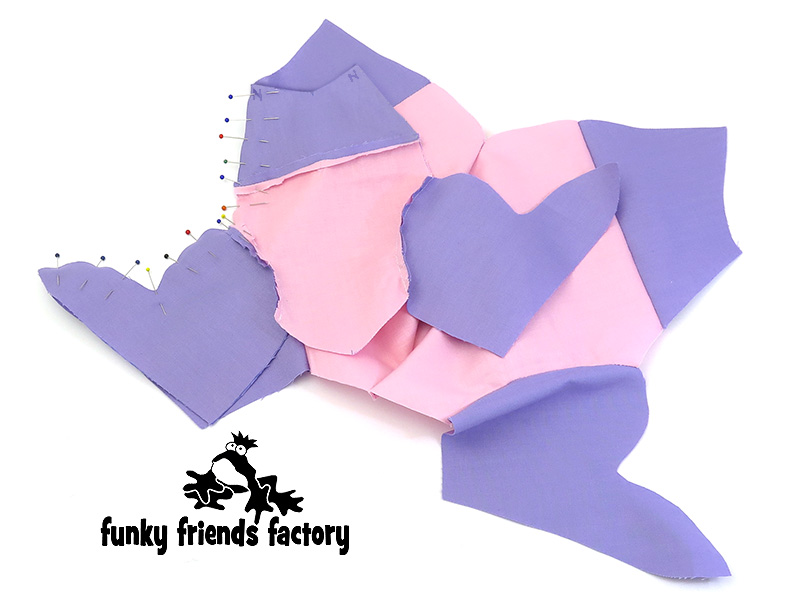
LEGS
STEP 10
Sew the INNER LEG PIECES to the TUMMY PIECE, matching the dot pattern markings.
TIP: Make sure to transfer the dot pattern markings to the fabric PIECES so you don’t get the INNER and OUTER LEG PIECES muddled up!
STEP 11
Sew the OUTER LEG PIECES to the BACK PIECES matching the double dots of the pattern markings.
TAIL
STEP 12a
Sew the TAIL PIECES together and clip the seams well.
STEP 12b
Turn the tail right sides out and stuff the tail with a little bit of toy stuffing.
STEP 13a
Pin the TAIL in position, on one of the BACK PIECES.
STEP 13b
Sew the TAIL in place with a 3mm(⅛inch) seam allowance.
STEP 13c
Sew the BACK PIECES together from L – M, with the TAIL in between.
I have added a dashed line in the photo below – to show you where the TAIL is (between the BACK PIECES).
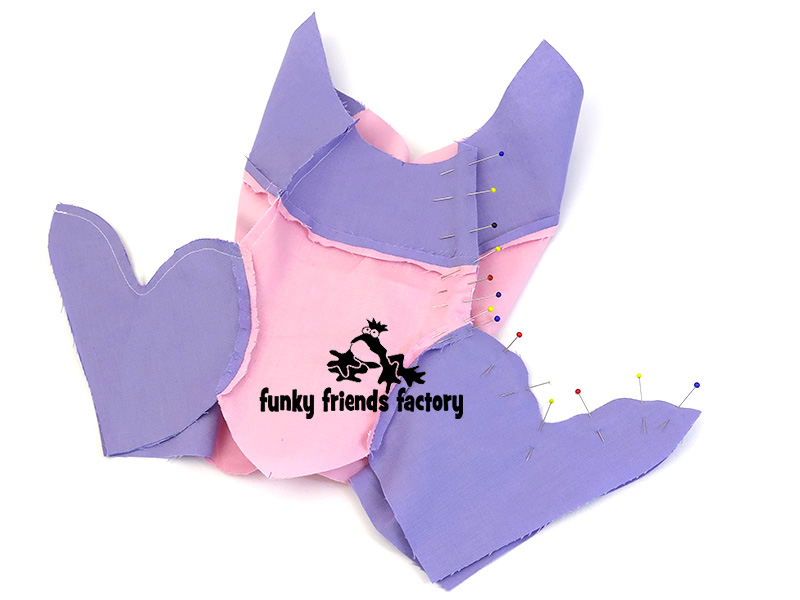
SIDE SEAM:
STEP 14a
Pin and sew the Panda together at the sides. First sew along the front of one leg, up the side of the TUMMY and CHEST to N.
STEP 14b
Repeat for the other side.
BASE:
STEP 15
Pin the Panda closed at the base, matching point M and O. Sew along the back of one leg, continue across the base of the TUMMY and BACK PIECES and sew along the back of the other leg.
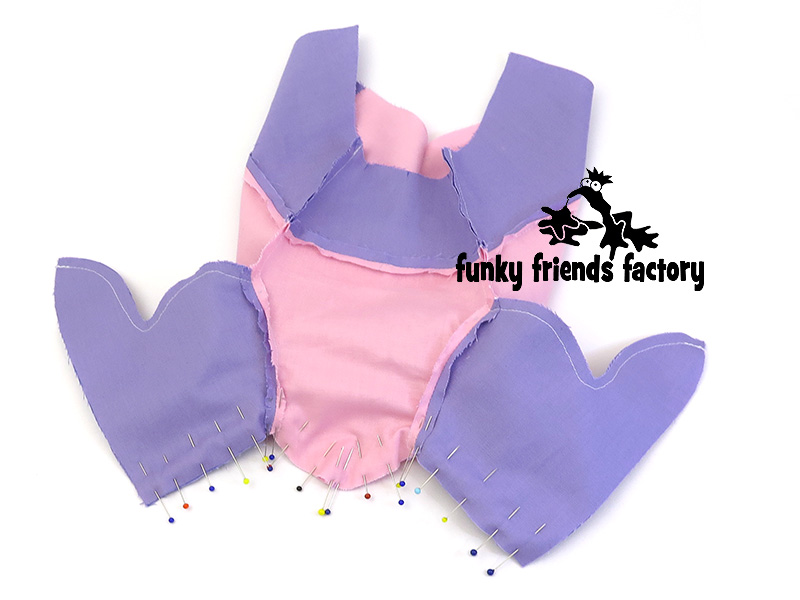
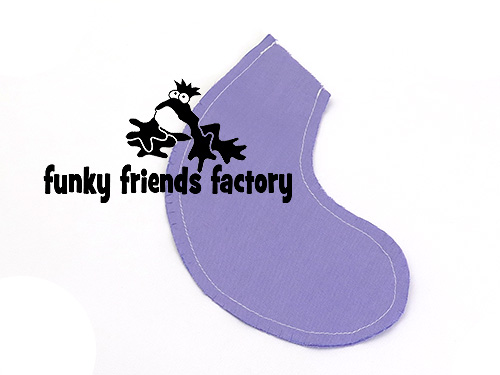
FOOT PADS:
STEP 16
Pin and sew the FOOT PAD PIECES in place, matching point O.
TIP: I have a tutorial on my blog to show you how to sew perfect plushie feet – it’s easy when you know how!

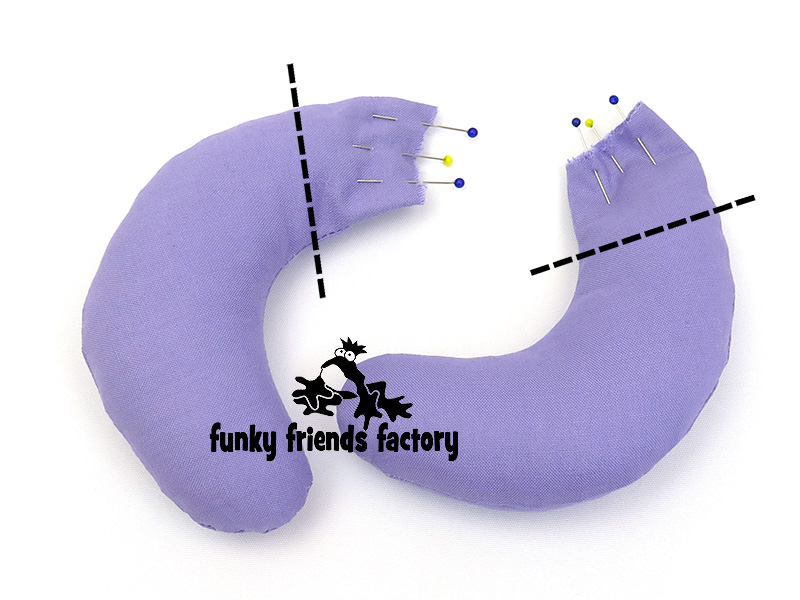
ARMS:
STEP 17a
Sew the ARM PIECES together in pairs leaving them open along the straight edge.
STEP 17b
Clip the seams well and turn the ARM PIECES right sides out. Stuff the ARMS leaving the top 12mm (1/2 inch) unstuffed (above the dashed lines).
TIP: Don’t overstuff the ARMS or it will be VERY difficult to sew the neck seam.
STEP 18a
Pin the ARMS PIECES to the CHEST & SHOULDER PIECES using the pattern markings to guide you, matching point N.
TIP: Check that the ‘hands’ are pointing towards the front (the TUMMY) so you don’t sew them on back to front!)
STEP 18b
Sew the ARM PIECES to the CHEST & SHOULDER PIECES with a 3mm(⅛inch) seam allowance.
(You can’t see the ARMS in the photo below because they are “INSIDE” the body!)
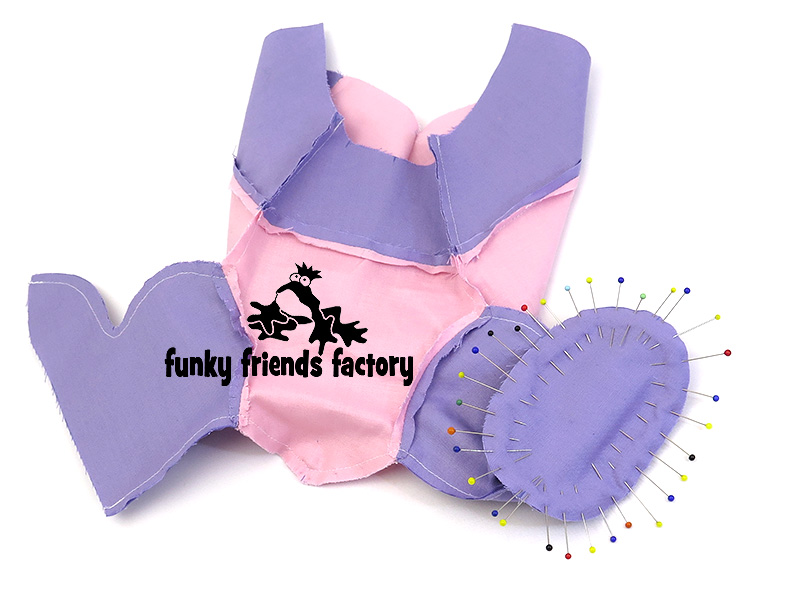
NECK SEAM:
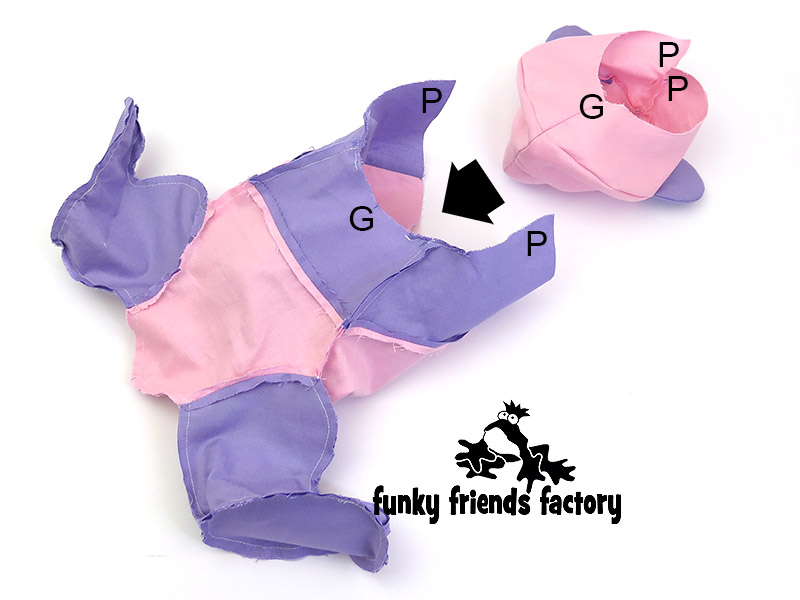
STEP 19
Sew the head to the body at the neck seam, from P – N – G – N- P.
TIP:I find the easiest way to do this is to turn the head right sides out and position it inside the body so you can pin the pieces with the fabric right sides together.
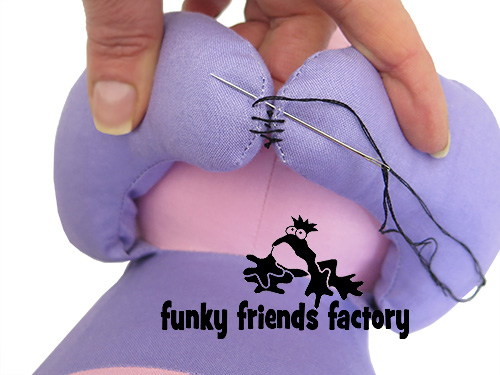
STEP 20
Pull the head back out of the body and pin the Panda closed at the back. Sew the BACK HEAD PIECES and SHOULDER PIECES closed from C – P – H, leaving the gap open for turning. (See the black arrow in the photo below).
BOTTLE:
STEP 21a
Sew the BOTTLE PIECE together at the side, leaving a gap for stuffing the bottle.
STEP 21b
Sew the BOTTLE BASE PIECE in place.
STEP 21c
For the BOTTLE TOP PIECE, remember to sew on the sewing line and then cut it out with a 5mm/¼inch seam allowance.
I added the dashed line in the photo below so you can see where I sewed!
TIP: If you are using a woven fabric like cotton, that isn’t very stretchy, you must clip the very curved seams very well or the BOTTLE TOP PIECES will be difficult to turn.
STEP 21d
Sew the BOTTLE TOP PIECE to the BOTTLE PIECE.
STEP 22a
Turn the bottle right sides out, stuff it with toy stuffing.
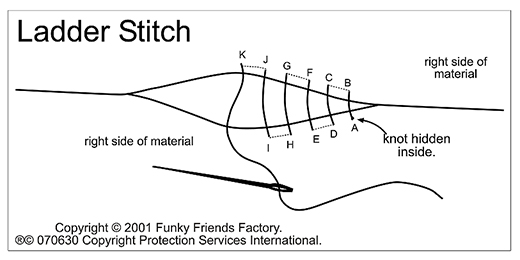
STEP 22b
Sew the gap closed on the side with a ladder stitch.
ASSEMBLY:
STEP 23
Turn the Panda right sides out through the stuffing gap.
STEP 24
Stuff the head, body and legs with toy stuffing.
FACE DETAILS:
STEP 25a
Use the templates to cut pieces of felt for the NOSE, PUPIL and EYE PATCH PIECES. Pin the felt pieces on the HEAD PIECE using the Face Sewing Diagram to guide you with their position.
TIP: How to cut Felt EASILY & ACCURATELY – 5 different techniques!
When you are cutting out small felt pieces, PINNING felt pieces is NOT as accurate as you’d think. This is because the pattern templates move or slip as you cut and you can end up with some very wonky shapes! I have put together this photo tutorial to show you 5 different techniques that I use to cut out Felt EASILY and ACCURATELY here!
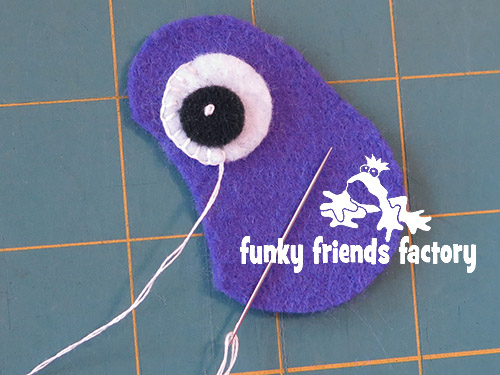
STEP 25b
When you are happy with the look of the eyes, sew the PUPIL and EYE PIECES to the EYE PATCHES (or glue these in place). Sew a French knot, with white embroidery thread, for each pupil.
STEP 25c
Pin the EYE PATCHES back in place on the FRONT HEAD PIECE and sew them on with matching embroidery thread and a blanket stitch.
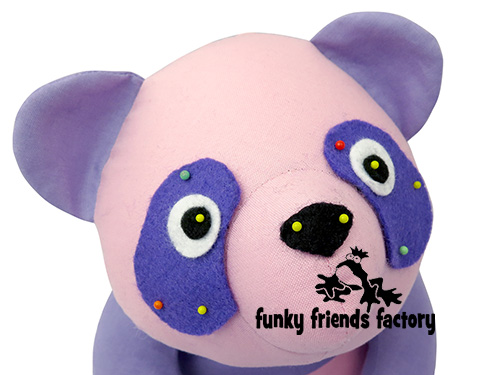

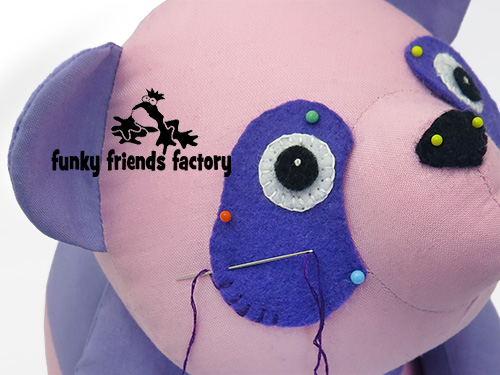
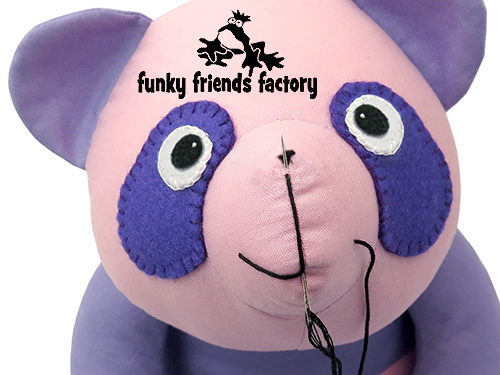
STEP 26
Use black embroidery thread to sew the mouth, using the instructions in the FACE SEWING DIAGRAM.
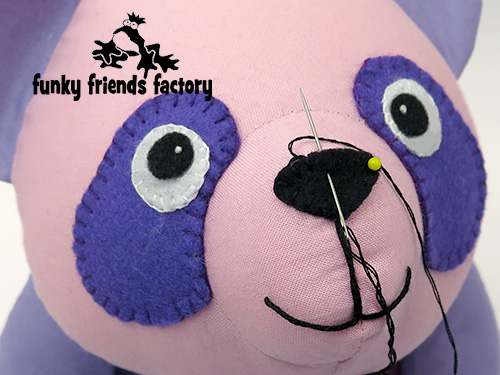
STEP 27
Pin and sew the NOSE PIECE in place.
TIP: When you are sewing on the EYE PATCHES and NOSE PIECE, hide the knots of your thread behind the felt pieces.
STEP 28
Sew the paws together with strong thread, so that your Panda holds his bottle quite tightly.
*I used black thread so you can see the stitching BUT it is best to use matching thread!
STEP 28
Sew the stuffing gap closed on the BACK PIECES using a ladder stitch.
Your Panda is ready to LOVE!
![]()
Come join the fun on Facebook!
When you’ve made your own toypanda – come and post some photos of your NEW Funky Friend for me to see on my Funky Friends Factory Facebook page.
You could WIN a FREE PATTERN in the MAKER OF THE MONTH Pattern Giveaway!
I can’t wait to see the Funky Friends you sew!

bye for now,
Pauline
![]()
