
I made this photo tutorial so you can see how to sew my Shark Sewing Pattern
~> scroll down for step-by-step photos!
.
*** PLEASE NOTE – this in ONLY a PHOTO TUTORIAL ***
The FULL PATTERN IS NOT included here.It is NOT A FREE PATTERN!
I have made this photo tutorial so people who have purchased my Shark Sewing Pattern can SEE how to sew my shark toy! (I wanted to explain this so you are not disappointed if you have found this page via a search engine and not from the link in my Sammy Shark toy sewing pattern!)
OK, let’s get going with the TUTORIAL!
STEP 1
Choose the fabrics for sewing the shark toy pattern. A shark can be any colour –
even PINK!

STEP 2
Sew 2 of the BACK FIN PIECES together. Turn them right sides out and use a turning tool or a wooden chopstick to make sure the seams are turned out nicely. Repeat for the other 2 BACK FIN PIECES. (You don’t need to stuff the BACK FINS.)

STEP 3
Sew 2 of the FRONT FIN PIECES together. Turn them right sides out and make sure the seams are turned out nicely. Repeat for the other 2 FRONT FIN PIECES.

STEP 4a
Stuff the FRONT FINS with toy-stuffing so they are not too fat because you need to sew through the toy-stuffing next. Use pins to hold the toy-stuffing in place.
STEP 4b
Remove some of the pins so you can sew a line of top-stitches along the dashed line as shown on the pattern markings. Snip the threads and put the FINS aside for later.


STEP 5
Sew the BODY PIECES together from A – B.

CRAFT EYES:
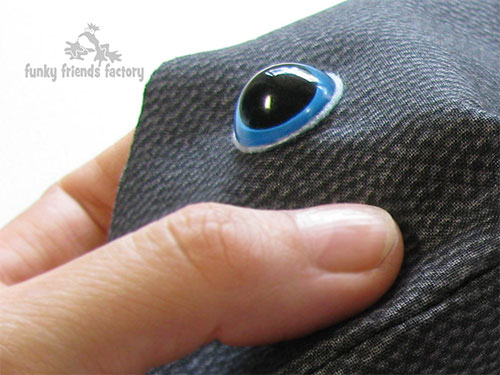
STEP 6
If you are using CRAFT EYES – insert them now. (If you are using buttons or felt pieces you will sew them on later.)
TIP: I like to add a circle of white felt behind craft eyes to make the shark’s eyes stand out against a dark fabric.

STEP 7
Pin the FRONT FINS and BACK FINS to the BODY PIECES with the tip of each fin facing the back – using the pattern markings to guide you. (Pin them with the fabric right sides together.)
STEP 8a
Match each CHIN PIECE with a TUMMY PIECE using the 2 dots of the pattern markings to guide you.
* I have marked the 2 dots in red in the photos below.
STEP 8b
Pin and sew the CHIN PIECES to the TUMMY PIECES matching the 2 dots of the pattern markings.


STEP 9
Sew the TUMMY-CHIN PIECES together along the center seams, sewing from D- E.

STEP 10
Sew the CHIN / TUMMY PIECES to the BODY PIECES (with the fins ‘sandwiched’ in between).

STEP 11
Sew the TAIL PIECES together from B – C.
Do NOT sew right around the tail now!

STEP 12
Sew the TAIL PIECES onto the TUMMY & BODY PIECES, use Sewing Diagram 1 to guide you.


STEP 13
Sew around the TAIL PIECES from C to G and continue to sew onto the TUMMY PIECES to H, use Sewing Diagram 2 to guide you.
*Don’t forget to leave a gap on the TUMMY PIECES
for turning and stuffing your shark!


STEP 14
Turn the shark toy right sides out through the gap you left on the BODY PIECES. Stuff the shark with toy stuffing. Start by stuffing the thinner bits (like the tips of the TAIL and the top fin on the BODY PIECES) with small bits of toy-stuffing to make sure these are firmly stuffed.

BUTTON EYES:
STEP 15
If you are using buttons for eyes sew them on now. (I used a small button on top of a bigger button for this shark).

STEP 16
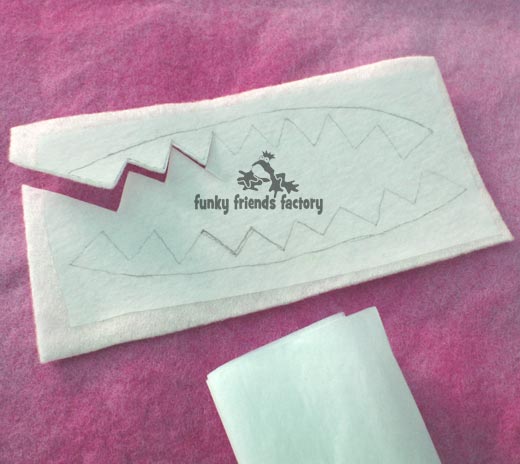
Cut the MOUTH and TEETH PIECES from felt.
TIP: I like to trace my felt pieces with a fabric marker. If you don’t have one ~ check out this blog post for other methods for cutting out felt pieces accurately.

STEP 17
Sew the TEETH PIECES to the MOUTH PIECE by sewing machine (or hand!) then hand sew the MOUTH PIECE onto the CHIN PIECE about 3cm from the front.

STEP 18
Use 3 strands of embroidery thread to sew long satin stitches for the gills.
TIP: Hide your finishing knot under the shark’s fin!


STEP 19
Use a ladder stitch to close the opening on the tummy.

Your Shark is ready to LOVE!
Come join the fun on Facebook!
![]()
I LOVE to see how your Funky Friends toys turn out! When you’ve made your own stuffed toy sharks you can come show them off ~>
Post a photo on my Funky Friends Factory Facebook page for me to see and YOU could win a FREE PATTERN!

Till next time, happy sewing,
Pauline
