
I made this photo tutorial so you can see how to sew my Lion Sewing Pattern ~> scroll down for step-by-step photos!
*** PLEASE NOTE – this is ONLY a PHOTO TUTORIAL ***
The FULL PATTERN IS NOT included here.
It is NOT A FREE PATTERN.I have made this photo tutorial so people who have purchased the pattern can SEE how to sew this stuffed toy lion! (I wanted to explain this so you are not disappointed if you have found this page via a search engine and not from the link in my Larry Lion toy sewing pattern!)
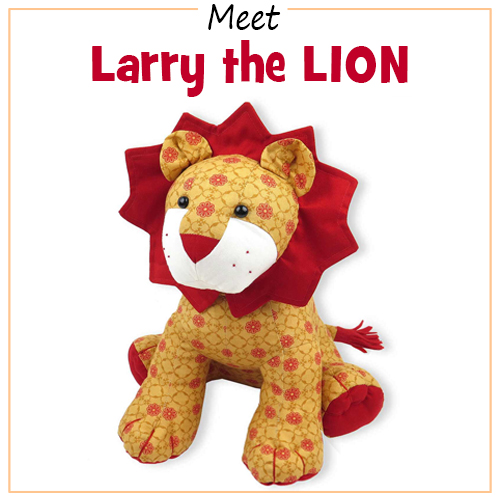
Choose some fabric to sew a Lion!
Larry Lion does not need be BROWN – he looks great in ALL sorts of colours!
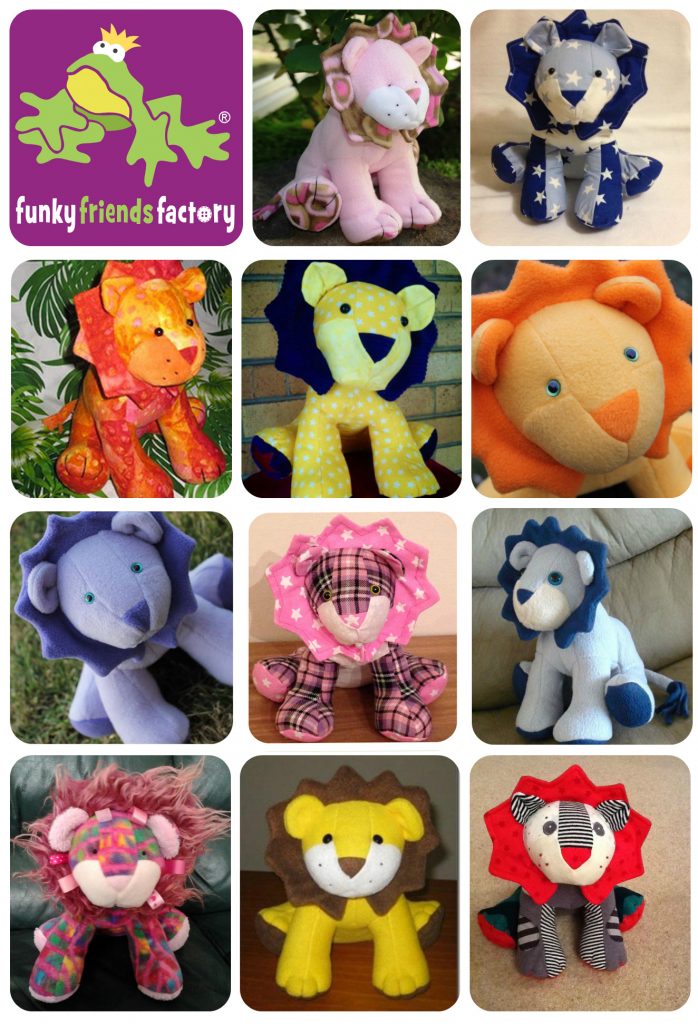
I decided to make a BLUE toy lion in this photo tutorial!

START WITH THE FACE:
STEP 1
Sew the NOSE PIECE to the FOREHEAD PIECE.
(I have outlined the NOSE PIECE with a red line in the photograph so it stands out more clearly!!)

STEP 2
Sew the SIDE HEAD PIECES to the CHEEK PIECES, from A – B, matching the stars of the pattern markings.

STEP 3
Use the FACE SEWING DIAGRAM and the steps below to sew the lion’s face.
STEP 1:
Sew a SIDE HEAD & CHEEK PIECE to the NOSE & FOREHEAD PIECE on one side.
(I have added a dashed, red line to show you where you will sew these pieces together.)
TIP: Finger press the seam open. This makes the seam nice and neat which will help you to get them lined up in Step 2.
(I have outlined the FOREHEAD PIECE with a red line in the photograph below so it stands out more clearly!!)
STEP 2:
Sew the other SIDE HEAD & CHEEK PIECE to the NOSE & FOREHEAD PIECE on the other side, and continue on, sewing the CHEEK PIECES together along the centre.
(Again, the dashed, red line shows where to sew.)
STEP 3:
Sew the CHIN PIECE to the CHEEK PIECES.
(In the photo below you can see the pieces BEFORE I pinned them together, and then on the right, you can see the CHIN PIECE pinned in position.)


STEP 4
Sew the EAR PIECES together, leaving the straight edge open. Turn them right sides out. Fold the ears in half. (I have added the red dashed lines to show you where to fold the pieces.) Sew the straight edges of the ear together, as shown on the pattern piece. This will form a fold when you open it up again.
(*I have added a yellow arrow in the photo to show you where to sew
because it’s hard to see the brown thread in this photo.)

STEP 5
Pin the EAR PIECES in place on the SIDE HEAD PIECES making sure that the fold of the ears face the front, and sew them in place with a tacking/hand stitch so they won’t slip and look crooked when you sew this seam later.
(I have outlined the EAR PIECES in red as they are hard to see in the photo below.)

STEP 6a
With right sides together, sew the MANE PIECES together. Clip the seams and snip off the points of the mane so that it will turn nicely.
STEP 6b
Use a turning tool (like a wooden chopstick or blunt pencil) to make the tips of the mane nice and pointy. With the MANE PIECES right sides out, pin the outside seam so that it lies flat then stitch around the pointed edge using a 5mm/¼inch seam allowance.
(I have used a red, dashed line to show you where to stitch in the photo below.)
TIP: If you are using fleece fabric for Larry use a large zig-zag stitch to sew around the inside raw edge (open, rounded edge) of the mane. I find this makes it easier when you sew the mane in place. (I don’t always do this, but you can sew a single stitched line instead of a zig zag for cotton fabrics.)


STEP 7
Pin the inside edges of the MANE PIECES to the face. Start at the top of the FOREHEAD PIECE and pin ‘down’ towards the CHIN PIECE on each side – there should be gap under the chin! Put the head aside to make the body. Looking at the lion’s face from the front – it should look like the photo below!)
😱 PLEASE DON’T WORRY:
The MANE PIECE does NOT reach right up to the edge of the fabric of the CHIN PIECE.
(The pink arrow in the photo below points to where the MANE ends.)
MIND the GAP!👍
There should be a gap between the ends of the MANE PIECE under the Lion’s chin, when the toy is finished. If you look carefully at my Larry Lion in the photo below you will see the gap! (The size of the gap will depend on the fabric you are sewing with – but don’t try to S-T-R-E-T-C-H the MANE PIECE to fit. The gap is needed to make it easier to sew the pieces together!)


LEGS and BODY:
STEP 8a
Sew the FRONT OUTER LEG PIECES to the BODY PIECES, with the fabric right sides together and matching the dots of the pattern markings.
STEP 8b
This is what it should look like once you have pinned the pieces together!
(The red, dashed line shows you where to sew them together.)


STEP 9a
Sew the TAIL PIECE and the TAIL TIP PIECE together as shown on the pattern pieces.
STEP 9b
Fold the sides of the tail ( the long edges) to the center of the tail, and then fold it in half (along the length) to form the tail.
(I have used a dotted red line to show you the center of the tail below.)
STEP 9c
Sew the tail closed at the side with a 5mm (¼inch) seam. You don’t need to sew the whole way down the tail tip, perhaps about 1cm (½ inch) at most.
STEP 9d
Cut the tassels for the tail, about 5mm (¼inch) thick.


STEP 10a
Pin the tail in place and sew the BODY PIECES together along the back (Remember to leave a gap for stuffing above the tail!).
STEP 10b
Sew the BACK OUTER LEG PIECES to the BODY PIECES, matching the dots of the pattern markings.


STEP 11
Sew the BACK INNER LEG PIECES and FRONT INNER LEG PIECES to the TUMMY PIECE, remember to place pieces with the right side of the fabric together, matching the crosses of the pattern markings.

STEP 12
Sew the TUMMY & INNER LEG PIECES to the BODY & OUTER LEG PIECES, matching points C, D, E and F. I find it’s easiest to sew the pieces together in the following order:
1. Sew the back of the back legs and ‘bottom’ closed first,
2. Sew the front of the front legs next.
3. Lastly sew the bit between the front and back legs,
TIP: Use lots of pins for this bit and don’t worry – you will find it wrinkles here, especially if you are using cotton fabric.

FINISH the HEAD:
STEP 13
Sew the BACK HEAD PIECES together, as shown on the pattern markings.

STEP 14
Pin the BACK HEAD PIECES to the lion’s face, with the mane and ears in between. Use LOTS of pins and sew this seam very carefully so the layers don’t slip.
I have outlined the NOSE PIECE in red!
TIP: If I am using fleece I use a tacking/hand stitch to secure all the layers first before I sew this seam on the sewing machine.

STEP 15
If you are using craft eyes insert them now. You can also use buttons or beads for Larry’s eyes.
TIP: If you are using beads – sew them on AFTER you stuff the head. When you sew them on, pull the beads into the head a little bit (pull them down towards the chin) so it forms eye sockets and rounder cheeks!

NECK SEAM:
STEP 16
Sew the HEAD to the BODY at the neck. (I find the best way to do this is to turn the head right sides out and position the head facing inside the body.)

STEP 17
Pull the HEAD PIECES back out of the body. Pin and sew the lion closed under the chin, neck and tummy. Sew from G – H – J – K.

FOOT PADS:
STEP 18
Sew the FOOT PAD PIECES in place. Use LOTS of pins so they don’t slip as you sew!
TIP: I have a tutorial on my blog to show you how to sew perfect plushie feet HERE – it’s easy when you know how!


ASSEMBLY:
STEP 19
Turn your toy right sides out. and Fill the legs and body with toy stuffing. Fill the head and the rest of the body nice and firmly with stuffing.

STEP 20
With black/ brown embroidery thread, sew the toes on the feet. (Follow the instruction in the pattern for this)

STEP 21
Use some black pins to help you decide where you want to place your lion’s whisker spots, then use black/ brown embroidery thread and French knots to sew on some spots for them.

STEP 22
Use a ladder stitch to close the opening on the Lion’s back.

Your Larry Lion is ready to LOVE!
Want to win a
FREE toy pattern?
It’s so EASY to enter our Pattern GIVEAWAY!
![]()
ALL you need to do is post a photo of a FUNKY FRIENDS FACTORY toy that you have made on the Funky Friends Factory Facebook Page .
At the end of each month I draw a winner and post the winner’s name on the Blog the following MONTH. I have an Album on Facebook for all the MAKEROFTHEMONTH winners. You can check it out HERE!
NOT on Facebook? ENTER by email! 😀
*** You can send me your photos by email too!
So come on! Share your photos ~>
The next winner could be YOU!!!
 .
.
Till next time,
Happy Sewing,
Pauline
xxx
![]()
