
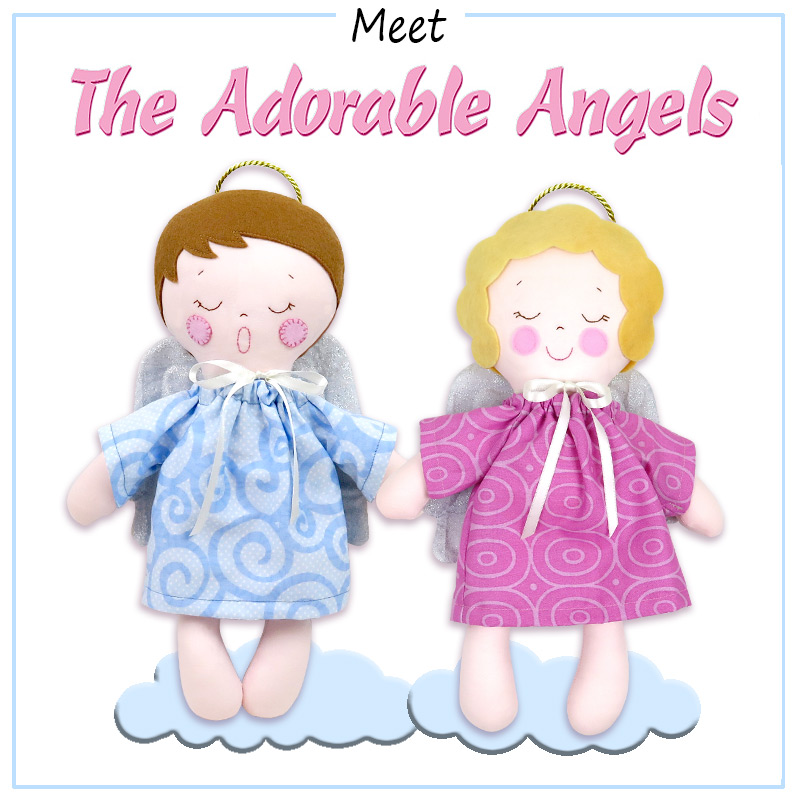
I made this photo tutorial so you can see how to sew my Adorable Angel Sewing Pattern ~> scroll down for step-by-step photos!
I designed the angel dolls so they have detachable wings and robes so they are great for playing dress up, and there are 2 hairstyles included (CURLS or NO CURLS) so you can make a whole heavenly choir of these Adorable Angels!
*** PLEASE NOTE – this is ONLY a PHOTO TUTORIAL ***
The FULL PATTERN IS NOT included here.It is NOT A FREE PATTERN!
I have made this photo tutorial so people who have purchased my Angel Doll Pattern can SEE how to sew an angel doll! (I wanted to explain this so you are not disappointed if you have found this page via a search engine and not from the link in my Adorable Angels Sewing Pattern)
We start with the ARMS & LEGS:
STEP 1
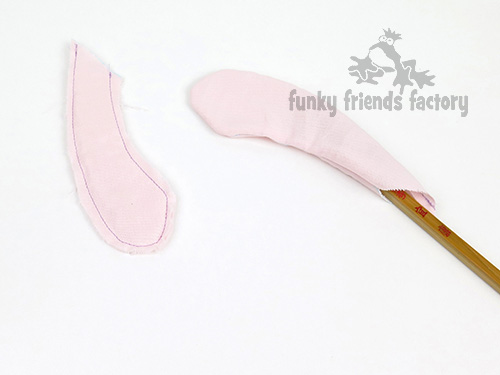
Sew the ARM PIECES together in pairs, leaving the top open for stuffing and turn them right sides out.
* I have used dark pink thread so you can see where I have sewn but you should try and match your thread to the fabric colour if you can!
STEP 2
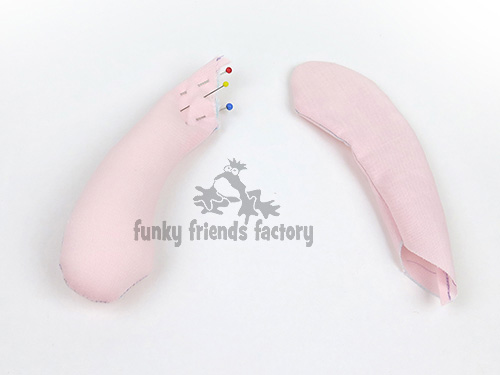
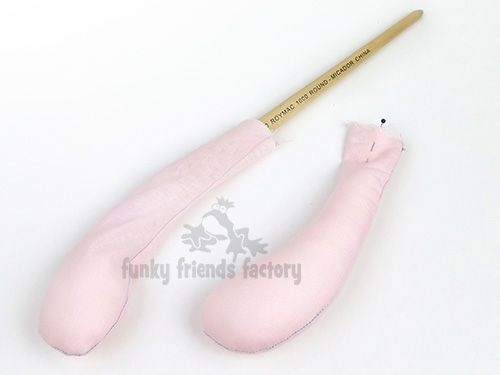
Stuff the arms with toy stuffing, leaving about 12mm (½ inch) unstuffed at the top, and pin the open edge closed.
STEP 3
Sew the LEG PIECES together in the same way, turn them and stuff them BUT this time leave a bit more space at the top. Leave about 2½cm (1inch) unstuffed at the top, and pin the open edge closed. (Do NOT stuff the top of the legs because this will make it hard to sew the BODY PIECES closed!)
BODY and HAIR:
STEP 4
Sew the BACK PIECES together along the centre back seam from A – B, leaving the bottom open (Do NOT sew right down to the bottom now!)
* Again, I have used dark pink thread but you should try and match your thread to the fabric colour!

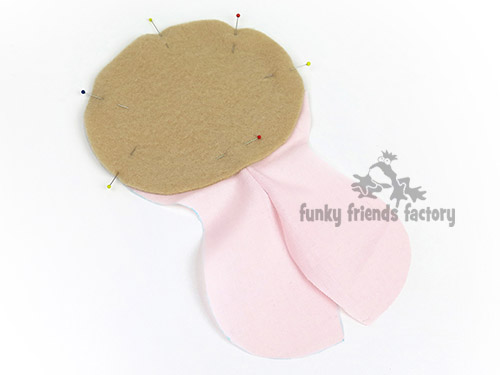
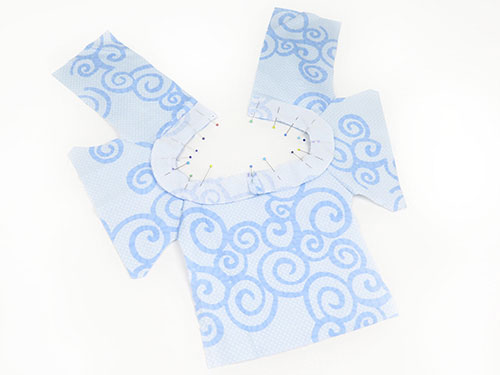
STEP 5
Finger press this seam open so it lies nice and flat. Turn the BACK PIECES right sides up and pin the BACK HAIR PIECE to them, matching point A. Sew the BACK HAIR PIECE in place, sewing about 3mm (⅛ inch) in from the edge.
TIP:Make sure it’s the BACK HAIR PIECE (it’s the big felt piece) BEFORE you sew it down! Felt would NOT be fun to unpick!
STEP 6
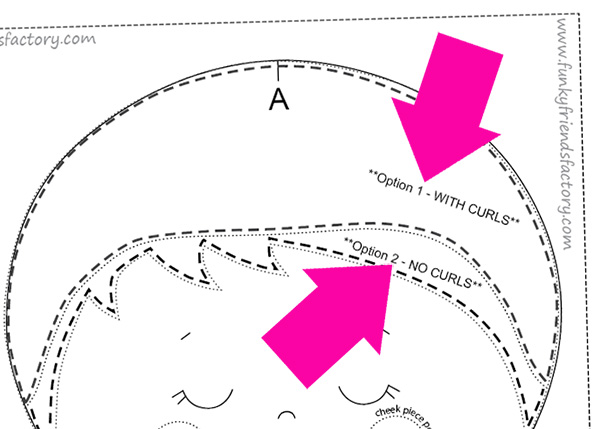
Trace the pattern markings for the angel’s face onto the right side of the FRONT PIECE. You can choose to have felt cheeks or freckles (see 1. on the pattern markings) and a singing mouth or a smiling mouth (see 2. on the pattern markings).
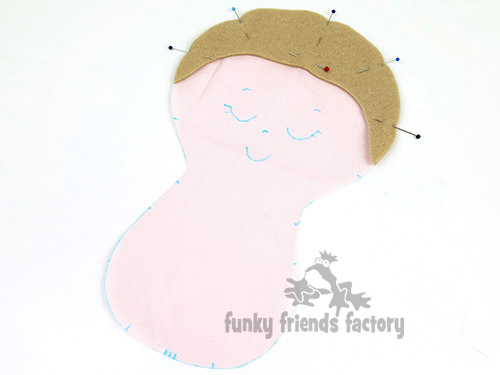
STEP 7
Pin and sew the FRONT HAIR PIECE to the FACE PIECE.
TIP: Choose Option 1 – if you want to have CURLS. Choose Option 2 – for NO CURLS.
ASSEMBLE THE BODY
STEP 8
Pin the ARMS to the FRONT PIECE using the pattern markings to guide you.
STEP 9
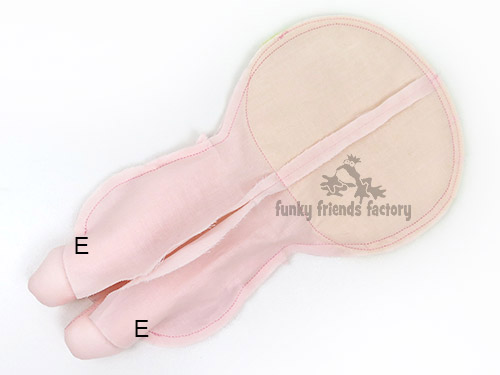
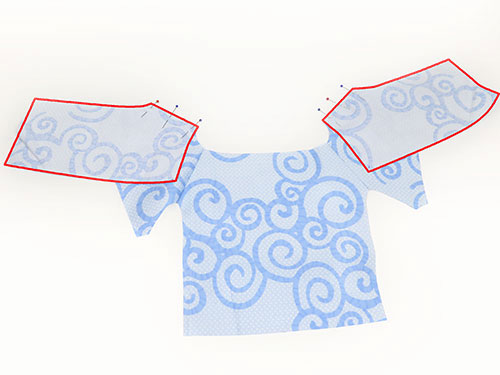
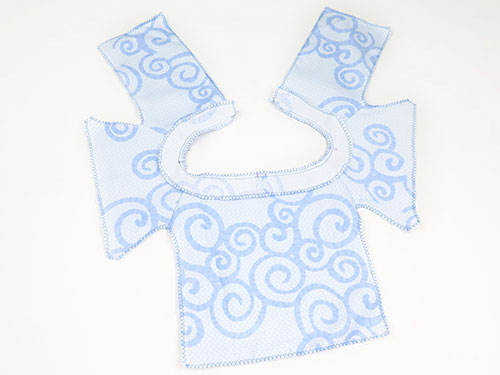
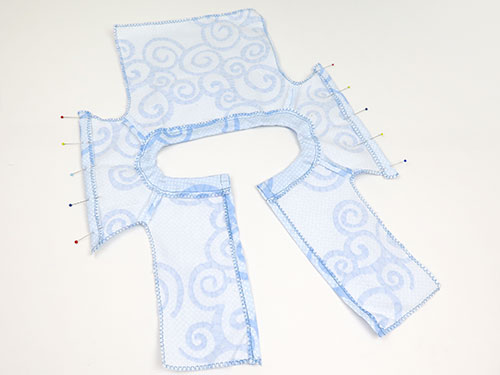
Pin and sew the BACK PIECES to the FRONT PIECE with the ARMS in between, making sure you catch all the layers in the seam. Sew from point E on one side, around the top of the head to E on the other side.
TIP: Check that the ARMS have been sewn into the seam properly now, it would be hard to fix this later.
STEP 10
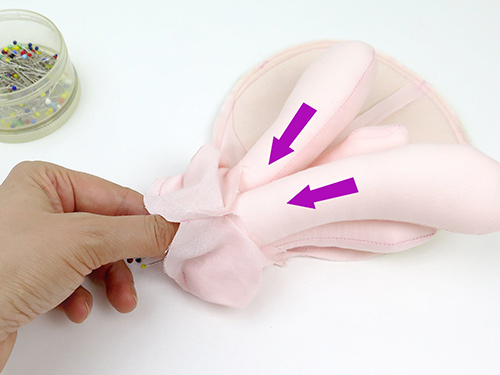
Push the arms up between the FRONT PIECE and BACK PIECES and out through the turning gap on the BACK PIECES. Pin and sew BACK PIECES together at the centre back seam from C – D.
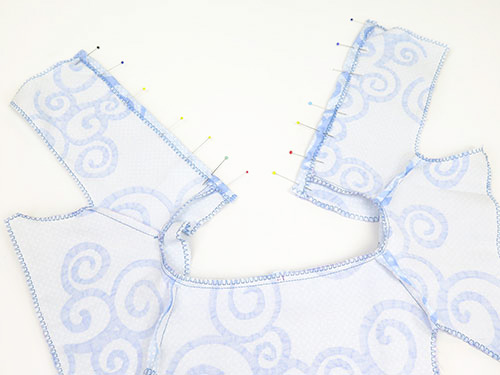
STEP 11a
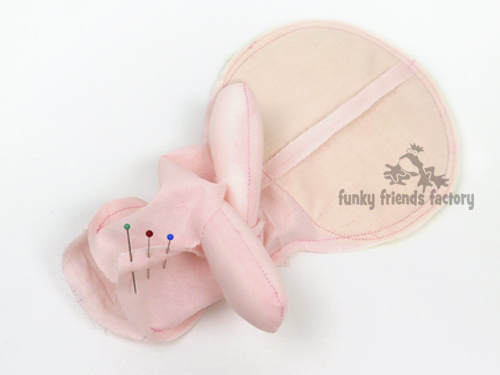
Push the top of the LEGS in through the turning gap.
STEP 11b
Pin them in position on the FRONT PIECE so that the ‘toes’ are sticking ‘up’ towards the face.
*** It is important to matching point D, in the middle so the ‘toes’ point to the middle – Angels are knock-kneed, you know!***
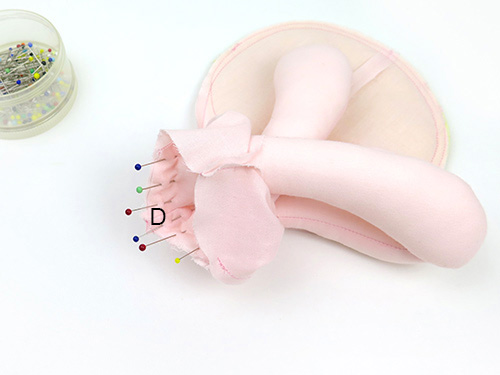
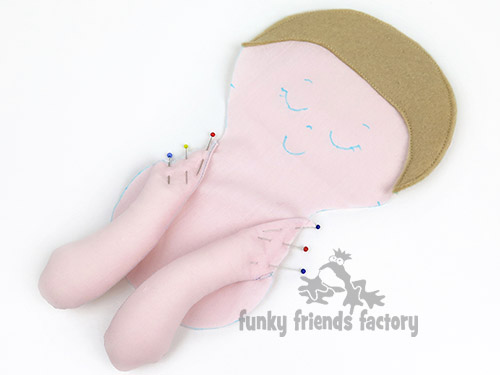
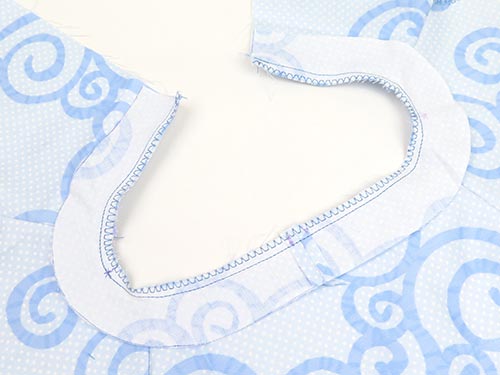
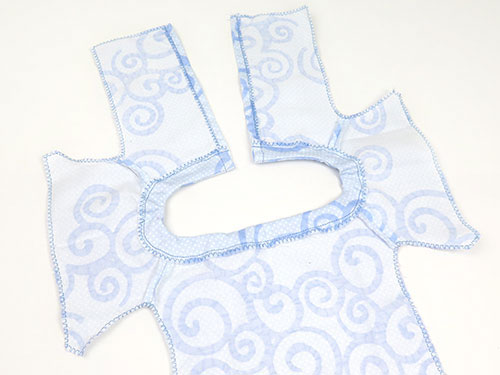
STEP 12
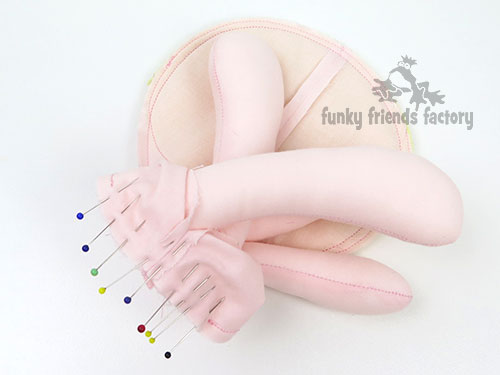
With the ARMS and LEGS still sticking through the turning gap, pin the BACK and FRONT PIECES together at the bottom, and sew them closed.
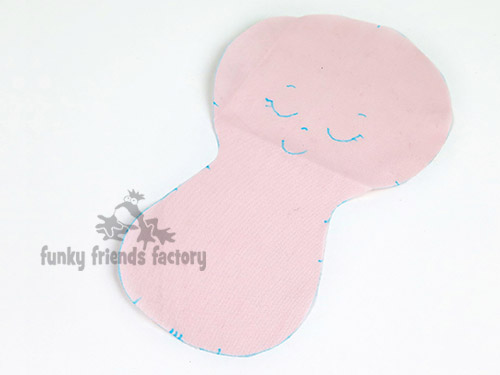
TIP:This is what is should look like now ~>

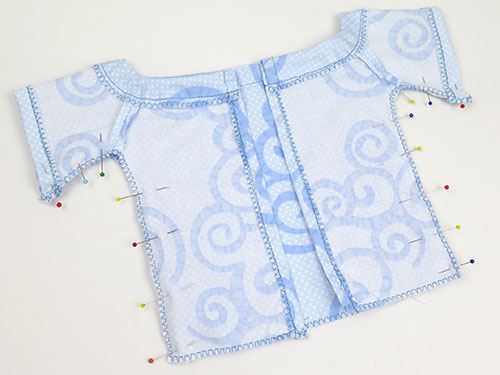
TURNING and STUFFING
STEP 13a
Turn your angel right sides out through the turning gap left on the BACK PIECES. It is very easy to pull the ARMS and LEGS out but take your time with the head!
TIP: Pull the head right sides out very gently and use a wooden chopstick (or the end of a paint brush or knitting needle) to smooth out the seam where the felt hair is. Run the end of the chopstick back and forth along the seam on the inside of the head until it is smooth!
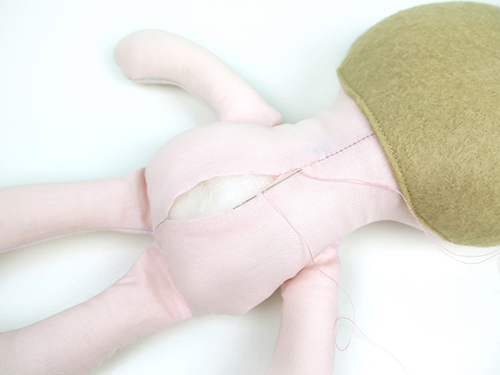
STEP 13b
Stuff the head quite firmly, but press it with the palm of your hand, so it is still a flat shape. Stuff the neck area very well so the head will stay up nicely, then finish stuffing the body with toy stuffing. Sew the stuffing gap on the BACK PIECES closed with a ladder stitch.


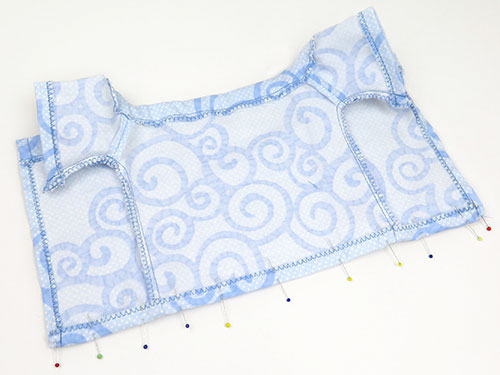
CURLS:
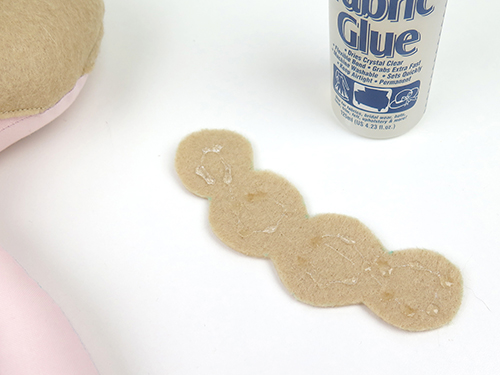
STEP 14a
Glue the BACK CURLS PIECE to the bottom of the BACK HAIR PIECE using a quick drying fabric glue.
TIP: I like to put glue on the BACK CURLS PIECE…
…and the part of the BACK HAIR PIECE where I am going to stick it – (just above the line of stitching holding the bottom of the BACK HAIR PIECE in place.)
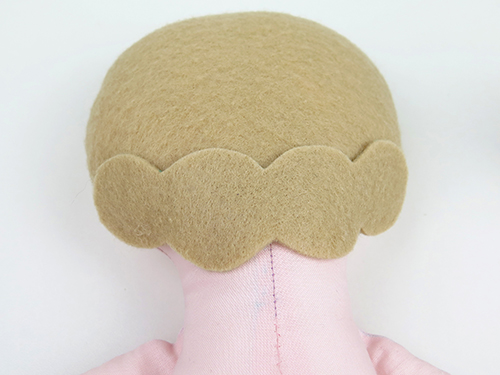
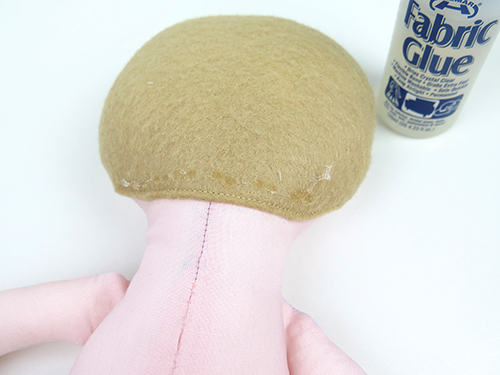
STEP 14b
Glue the FRONT CURLS PIECE to the FRONT HAIR PIECE with a line of fabric glue just above the line of stitching holding the FRONT HAIR PIECE in place.
This is how it should look now –
FACE:
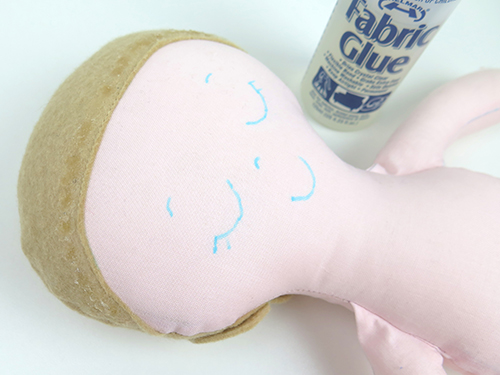
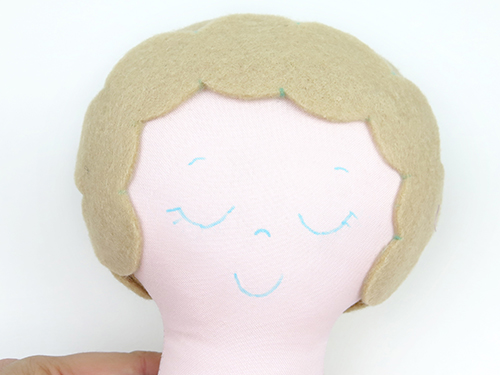
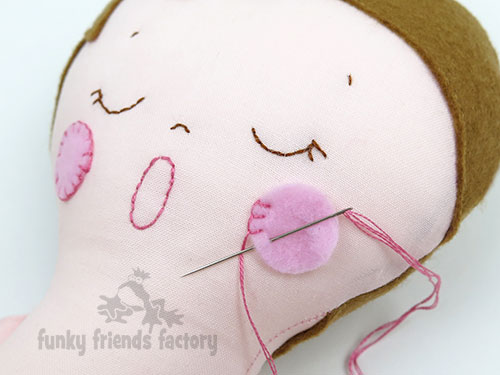
STEP 15a
Use the pattern markings as a guide to embroider the eyes, nose and eyebrows in brown embroidery thread.
STEP 15b
Use pink embroidery thread for the mouth.
STEP 15c
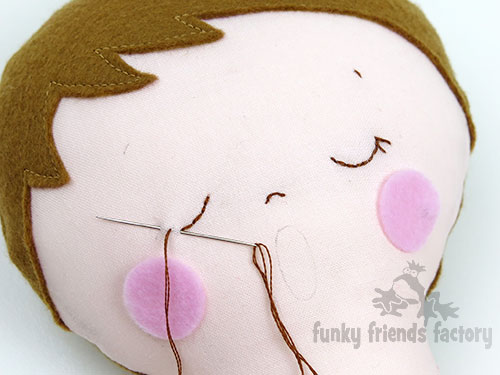
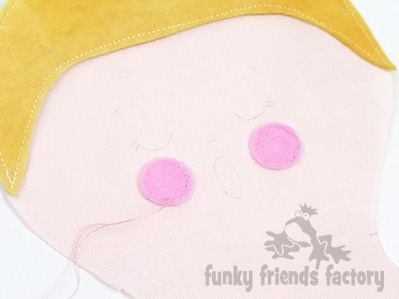
Cut the CHEEK PIECES from pale pink felt and glue or sew them in place.
TIP: You can sew the cheeks on by machine BUT you need t odo this when you sew the FRONT HAIR PIECE in place.

ROBE:
STEP 16a
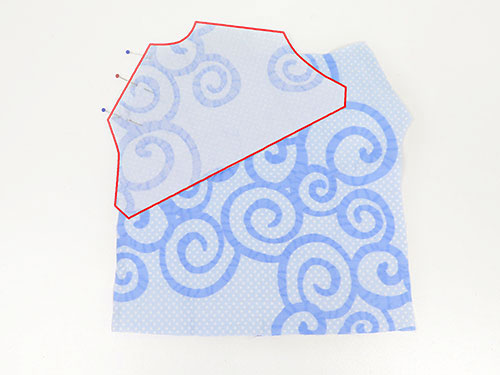
Sew the SLEEVE PIECES to the ROBE FRONT PIECE from F – G.
STEP 16b
Sew the ROBE BACK PIECES to the SLEEVE PIECES from F – G.
STEP 17a
Sew the RIBBON CASING PIECES together (at the front) from H – K.
STEP 17b
Open out the RIBBON CASING PIECES and pin them to the ROBE BACK, ROBE FRONT & SLEEVES, (with the right sides of the fabric facing) , matching H, M and the star pattern making.
STEP 17c
Sew the RIBBON CASING in place along the inside seam. Finish this seam with a zig-zag or an overlocker (serger) stitch.
STEP 18
Sew a zig-zag stitch or use an overlocker (serger) to finish all the pieces now.
TIP: If you have pinking shears you can cut all of the ROBE PIECES out with them so that you do not need to finish the edges of the ROBE PIECES with a zig-zag or overlocker stitch!
STEP 19
Fold and sew a 5mm (½ inch) hem on the centre back edge of the ROBE BACK PIECES and RIBBON CASING PIECES between O and N.
STEP 20
Fold and pin the RIBBON CASING flat again with the wrong sides of the fabric facing the ROBE BACK, ROBE FRONT & SLEEVE PIECES and sew a line of stitching about 15mm (⅔ inch) from the inside seam, to create the casing for the ribbon.
STEP 21
Fold and sew a 5mm (½ inch) hem on the SLEEVES.
STEP 22
Fold the ROBE PIECES with the fabric right sides together and sew the together along the side seams with a ¼ inch seam.
TIP: If you want to be nice and neat, fold the seam on the SLEEVES to the front ans sew it flat so the seam won’t be seen when the ROBE is on the angel!
STEP 23
Fold and sew a 12mm (½ inch) hem on the bottom of the ROBE. You can add some lace to your robe if you like to be a bit fancy but it isn’t necessary.
STEP 24a
Cut a 65cm (25inch) piece of 6mm (¼ inch) ribbon and thread this through the casing using a large needle (safety pin or bodkin).
STEP 24b
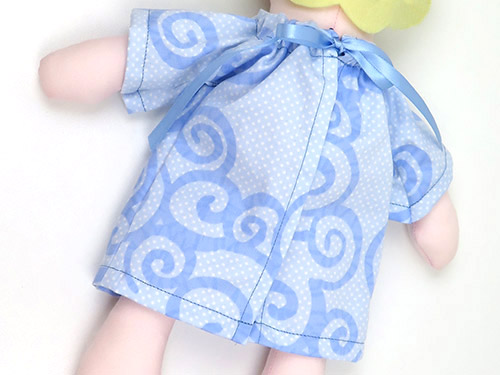
Put the ROBE on the angel and tie the ribbon with a bow at the back
TIP: I like to overlap the sides of the ROBE PIECES and hand sew them closed at the bottom, to stop the robe flapping open!😇
WINGS:
STEP 25a
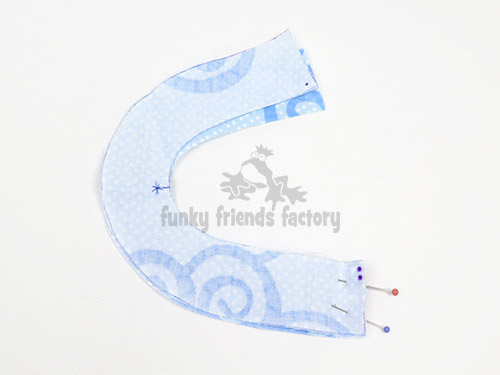
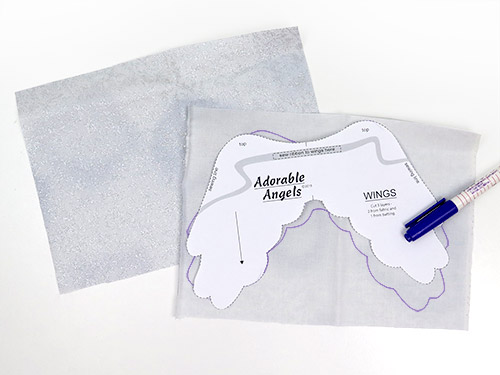
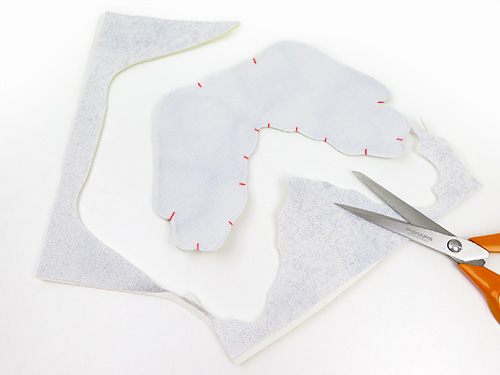
Cut 2 pieces from the wing fabric 18x25cm wide (7x10inches wide) and cut another piece the same size from batting. Trace the WING PIECE onto the wrong side of one of the pieces. (This is the sewing line.)
STEP 25b
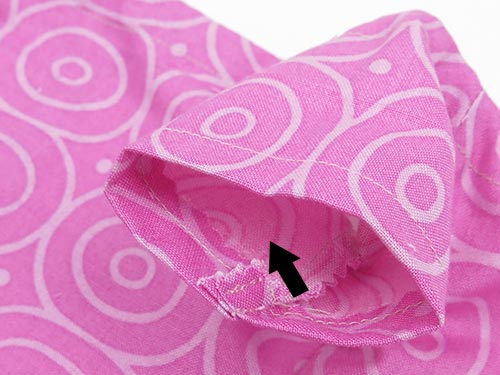
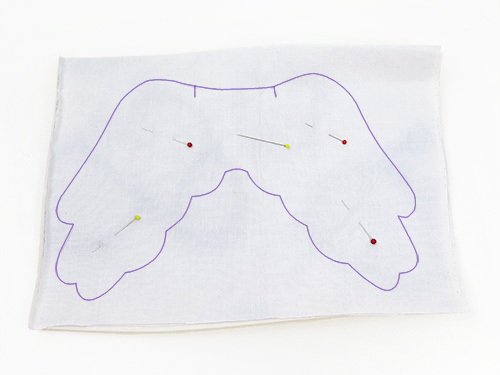
Pin the wing fabric with right sides facing on top of the piece of batting and sew through all 3 layers, on the sewing line you traced.
STEP 25c
Trim the 3 layers, leaving 5mm (¼ inch) outside the sewing line, and clip the seam well to help the WINGS turn nicely.
* I have marked where I clipped the wings with red lines in the photo below.
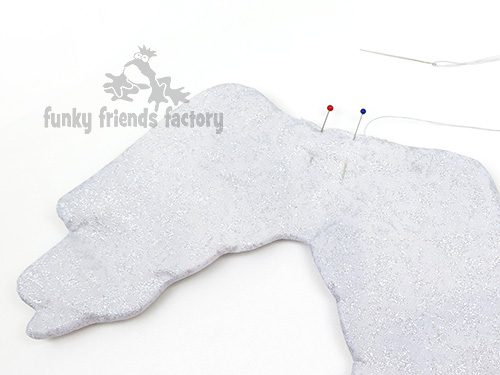
STEP 26a
Turn the WINGS right sides out through the turning gap. Tuck the seam allowance under (in) and hand sew the turning gap closed with a ladder stitch.
STEP 26b
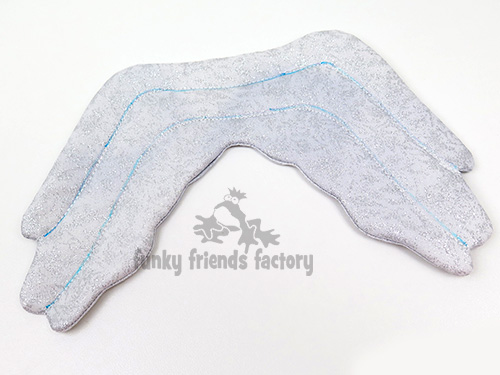
Mark where to sew the topstitch lines on the WINGS with a fabric pen, or tailor’s chalk, using the pattern markings to guide you. Sew the topstitch lines with a slightly longer than normal stich as you are sewing through a lot of layers!
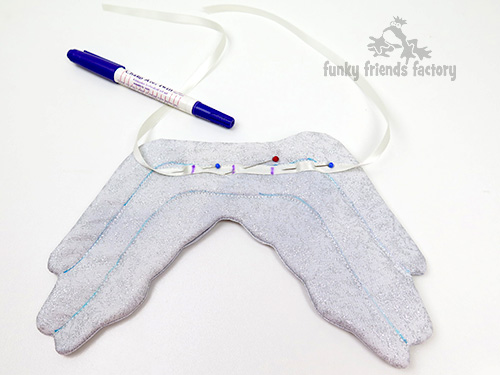
STEP 27
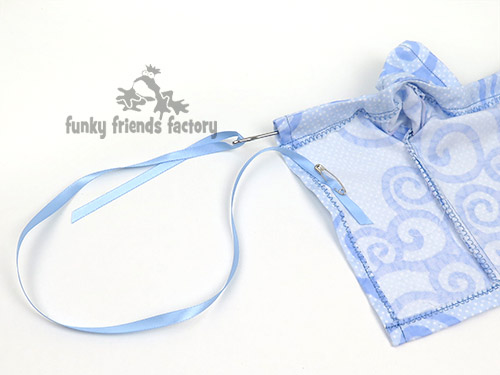
Find the centre of the wing ribbon and mark this point. Mark a point 25mm (1inch) on either side of the centre and pin the ribbon on the wings covering the topstitching line as show in the pattern markings. Sew the ribbon to the WINGS but do not sew past the markings or this will be wider than the Angel’s neck. Tie the WINGS on your angel’s back. Use a simple bow so they can be taken on and off.
HALO – can’t forget this!
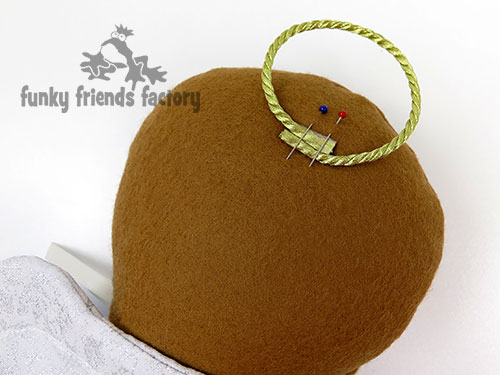
STEP 28a
Cut a 20cm (8 inch) piece of gold (or silver) cord. Cord unravels very easily so wrap some clear tape around the cord BEFORE you cut! Bend it round to form a circle and sew the ends together, sewing through the tape. position the halo on the angel’s head.
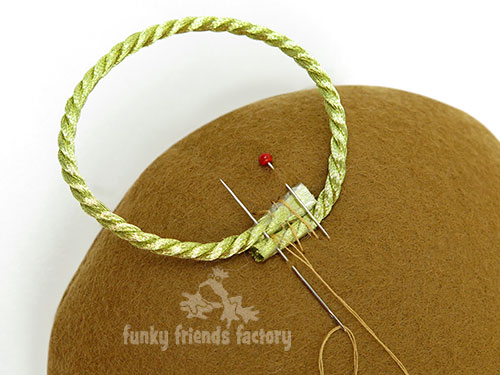
STEP 28b
Sew the halo in place sewing back and forth, through the tape, cord, felt and fabric of the doll’s head, until it is quite securely attached. It can be flat, sticking up at the front, in the centre of the head, off to one side…. however YOU think it looks cutest! 🙂
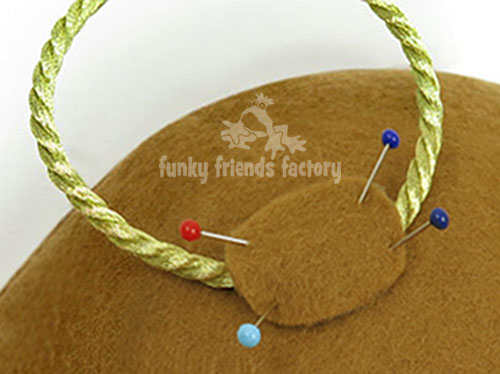
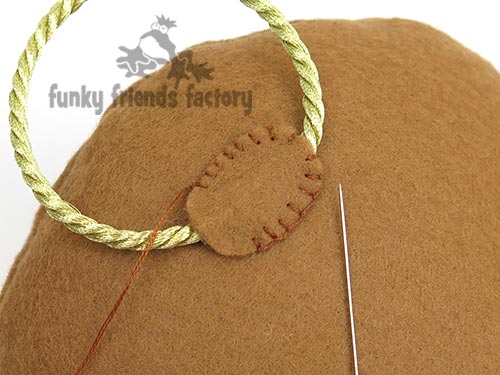
STEP 28c
Cut the HALO SPOT PIECE from felt the same colour as the Angel’s hair and glue this over the tape holding the cord together.
TIP: I like to use some pins to hold the felt so it stays nice and tight around the cord as it dries and then sew down the HALO SPOT PIECE with matching embroidery thread!
Your ANGEL Doll is ready to LOVE!
Want to win a
FREE toy pattern?
It’s so EASY to enter our Pattern GIVEAWAY!
![]() ALL you need to do is post a photo of a FUNKY FRIENDS FACTORY toy that you have made on the Funky Friends Factory Facebook Page .
ALL you need to do is post a photo of a FUNKY FRIENDS FACTORY toy that you have made on the Funky Friends Factory Facebook Page .
At the end of each month I draw a winner and post the winner’s name on the Blog the following MONTH. I have an Album on Facebook for all the MAKEROFTHEMONTH winners. You can check it out HERE!
NOT on Facebook? ENTER by email! 😀
*** You can send me your photos by email too!
So come on! Share your photos ~>
The next winner could be YOU!!!
 .
.
Till next time,
Happy Sewing,
Pauline
xxx
![]()
