
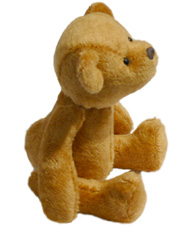
Picture guide on how to make a traditional, FULLY-JOINTED, mohair teddy bear!
I have designed this jointed, mohair, teddy bear pattern for beginners to learn how to make a fully jointed teddy bear.
As a traditional teddy bear pattern, Pip will be great for showing you the basics of teddy bear making, and once you’ve got those skills, the world of wonderful and wacky bears opens up…
I think Pip turned out as cute as a button- if I must say so myself!
*** You can check out the full range of Teddy Bear Artist’s Patterns currently in stock ***
Baby ‘Pip’
A 9”/27cm, traditional, jointed, mohair TEDDY BEAR PATTERN
If you are new to making teddy bears or you have always wanted to try it but thought it would be too difficultDON’T PANIC – if you can sew, you can sew a teddy! This picture tutorial will show you how to make professional looking teddies in next to no time.
MATERIALS Required for ‘Baby Pip’
- Fat ¼ short pile mohair (50cmx40cm / 20”x18inch).
- 6mm black glass eyes.
- Two 25mm discs(neck), four 20mm discs(legs), four 15mm discs(arms), 5 cotter pins &10 washers.
- Strong thread/dental tape (for sewing on eyes and securing neck seam.)
- Black/gray embroidery thread for nose and a scrap of black felt.
- General sewing supplies (thread,pins, long & sharp needles, small pointed scissors, etc).
- Craft glue & firm card for templates, a fine tipped permanent marker pen.
- Synthetic toy stuffing.
INSTRUCTIONS
You can stitch mohair teddy bears by machine or hand, whichever you prefer. Always use a 3mm / ⅛ inch seam and sew right sides together unless directions state otherwise.
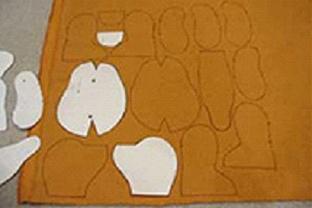
Paste the pattern pieces onto cardboard and cut out to make templates for your pieces. Lay your templates on the wrong side of the fabric, matching the arrows to the pile of your fur. (PILE is the direction in which the fur lies.) Trace the pieces and transfer all pattern markings to the fabric using a permanent marker. Test your pen first to see that it doesn’t show through to the right side of the fabric. Using a very fine, sharp pair of scissors, cut out your pieces, remember to cut ONLY the backing material, not the fur!
………………………………………………………………………………………………………………………………………………….
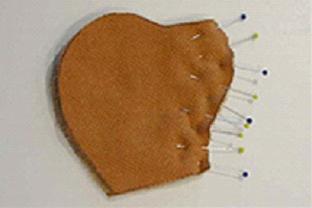 Pin the head pieces together and sew from the nose to the neck.
…………………………………………………………………………………………………………………………………………………
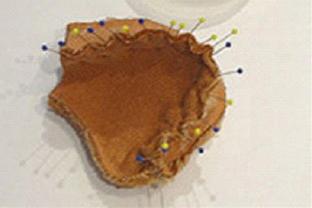
Pin the gusset in place and sew from the nose to the to the back of the head down the one side. Repeat for the other side, from the nose to the back of the neck on the other side. This tip from one of our teddy bears artists – Liz Walker Watts helps to keep your teddy’s face even. (I like to sew the teddy by machine because it goes quicker, but I find I have to sew around the nose by hand
when I sew the gusset in place because it’s a bit awkward on the machine.)
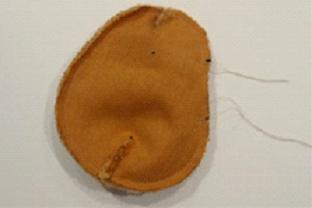
Turn the head right side out fill the head firmly, especially the snout area. This is really important for when you are sewing on the facial features later.
………………………………………………………………………………………………………………………………………………..
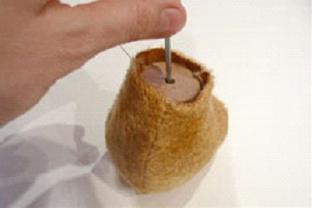 Push a cotter pin through a washer and the neck disc and place this in the head opening. Use strong thread, run a gathering stitch around the neck opening. Pull the fabric in around the cotter pin, secure the thread well, tie off and sew threads back inside the head.
………………………………………………………………………………………………………………………………………………….
 Pin and sew the darts on both of the body pieces. Sew the body pieces right sides together, leaving the gap at the back for stuffing your bear.
………………………………………………………………………………………………………………………………………………….
 Pin and sew the ears. Leave the flat edge open for turning. Turn edges under and stitch the ears closed. Use a gathering stitch along the base of the ear to gather it a bit. Position the ears on the head and sew them in place with a ladder stitch. Position the top and bottom edge of the ears slightly forward to create a curve in the ears.
………………………………………………………………………………………………………………………………………………….
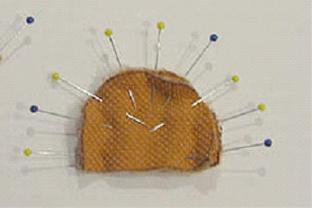
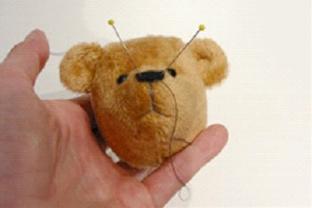 Use black-headed pins to experiment with eye positioning. When you are happy with the ‘look’ of the eyes, mark their position with your permanent marker. Use dental tape to sew the eyes on. Pass this tape through the wire loop of each glass eye, and then squeeze the loop closed with pliers. Sew each eye in place using a long needle, pulling the wire loop of the eye through the seam stitching on the head. Make sure both strands of tape come out of the head just above the neck disc, and quite close together. Tie the tape from both eyes together, pulling them tightly so that the eyes are pulled into the head a bit. Tie them securely and sew them back inside the head.
Sew the mouth in the shape of an upside down ‘Y’ then cut a piece of felt the shape of the nose that you want. I find a rectangle ends up becoming rounded at each end as I sew which forms a nice rounded nose shape.
…………………………………………………………………………………………………………………………………………………..
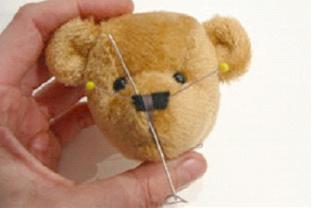 Start in the center and use satin stitch sewing to the one side first. Go back to the center and sew out to the other side.
…………………………………………………………………………………………………………………………………………………..
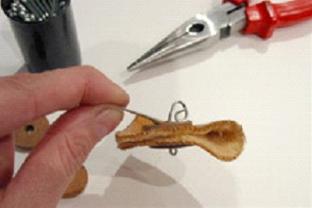 (This photo shows you how to bend a cotter pin open then how to curl each side back on itself.)
Turn the body right sides out. Push the extended part of the cotter pin, sticking out of the head, into the seam at the top of the body. Slip another disc and washer over the cotter pin, from inside the body, then use your pliers to bend the cotter pin open like this photo.
…………………………………………………………………………………………………………………………………………………..
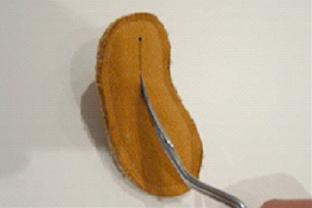 With right sides together sew the leg pieces together, from the toe around the top of the leg to the heel. Leave the flat edge open! Pin and sew the foot pad in place, then repeat for the other leg. Use really sharp scissors to snip a hole open on the inside of each leg. Turn the leg right side out through this hole. Stuff each leg firmly then Slip a washer and a leg disc onto a cotter pin and place this inside the leg opening. Making sure the leg is firmly stuffed, tuck in the raw edges of the hole you cut and sew this closed with a ladder stitch. Pull the thread tightly to make the stitches invisible. Tie off the thread tightly and sew the ends back into the leg.
Take the body and push the cotter pin of one completed leg through the leg position marking of the body. (You may need to make a little hole with the sharp scissors first.) Slip another disc and washer over the cotter pin from inside the body and bend the cotter pin, as before. Do the same with the other leg.
…………………………………………………………………………………………………………………………………………………..
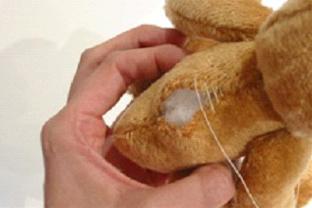 Fill the body firmly and sew the opening closed at the back with ladder stitching. Pull the stitches tightly to make them invisible.
Our little teddy is done!
NOW that you have seen how it’s done, the last thing to tell you is – BEWARE teddy bears are addictive… pretty soon you’ll have a whole lot of little teddy bear friends to have a teddy bear’s picnic with!
You can also take a look at ALL the Teddy Bear Patterns we have in stock, and the artist’s teddy bear making tips. I have chosen to stock these 3 International Teddy Bear Artists as I think their teddy bear paterns are really cute and I have to admit, they’re much nicer than anything I could design myself, so I’m sticking to my soft toy designs!
I hope you enjoyed that introduction to the world of jointed bears…

.
All the best,
Pauline
![]()

0 Comments